i18n_extension
This package only works with Dart 2.6.0 support. So if your Flutter is in the stable channel you may need to change it to the dev channel, by typing this in the console: flutter channel dev and then flutter doctor.
Non-boilerplate Translation and Internationalization (i18n) for Flutter
Start with a widget with some text in it:
Text("Hello, how are you?")
Translate it simply by adding .i18n to the string:
Text("Hello, how are you?".i18n)
If the current locale is 'pt_BR', then the text in the screen will be
"Olá, como vai você?", the Portuguese translation to the above text.
And so on for any other locales you want to support.
You can also provide different translations depending on modifiers, for example plural quantities:
print("There is 1 item".plural(0)); // Prints 'There are no items'
print("There is 1 item".plural(1)); // Prints 'There is 1 item'
print("There is 1 item".plural(2)); // Prints 'There are 2 items'
And you can invent your own modifiers according to any conditions.
For example, some languages have different translations for different genders.
So you could create gender versions for Gender modifiers:
print("There is a person".gender(Gender.male)); // Prints 'There is a man'
print("There is a person".gender(Gender.female)); // Prints 'There is a woman'
print("There is a person".gender(Gender.they)); // Prints 'There is a person'
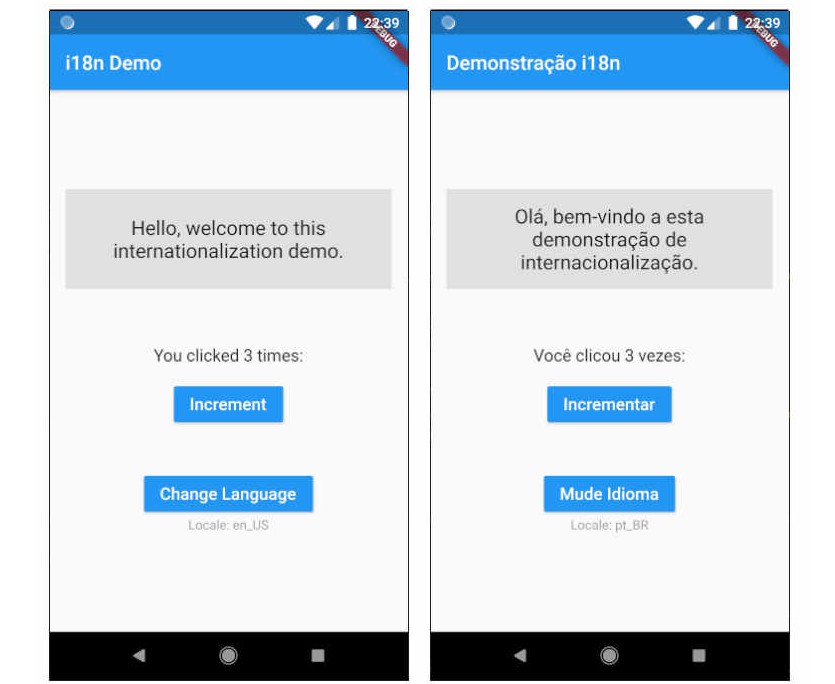
See it working
Try running the example.
Good for simple or complex apps
I'm always interested in creating packages to reduce boilerplate.
For example, async_redux is about Redux without boilerplate,
and align_positioned is about creating layouts using less widgets.
This current package is also about reducing boilerplate for translations,
so it doesn't do anything you can't already do with plain old Localizations.of(context).
That said, this package is meant both for the one person app developer and the big company team.
It has you covered in all stages of your translation efforts:
-
When you create your widgets, it makes it easy for you to define which strings should be
translated, by simply adding.i18nto them. These strings are called "translatable strings". -
When you want to start your translation efforts, it can automatically list for you
all strings that need translation. If you miss any strings, or if you later add more strings
or modify some of them, it will let you know what changed and how to fix it. -
You can then provide your translations manually, in a very easy-to-use format.
-
Or you can easily integrate it with professional translation services, importing it from,
or exporting it to any format you want.
Setup
Wrap your widget tree with the I18n widget, below the MaterialApp:
import 'package:i18n_extension/i18n_widget.dart';
...

@override
Widget build(BuildContext context) {
  return MaterialApp(
    home: I18n(child: ...)
  );
}
The above code will translate your strings to the current system locale.
Or you can override it with your own locale, like this:
I18n(
  initialLocale: Locale("pt_br"),
  child: ...
Note: Don't ever put translatable strings in the same widget where you declared the I18n widget,
since they may not respond to future locale changes. For example, this is a mistake:
Widget build(BuildContext context) {
  return I18n(
    child: Scaffold(
      appBar: AppBar(title: Text("Hello there".i18n)),
      body: MyScreen(),
  );
}
You may put translatable strings in any widgets down the tree.
Translating a widget
When you create a widget that has translatable strings,
add this default import to the widget's file:
import 'package:i18n_extension/default.i18n.dart';
This will allow you to add .i18n and .plural() to your strings, but won't translate anything.
When you are ready to create your translations, you must create a dart file to hold them.
This file can have any name, but I suggest you give it the same name as your widget
and change the termination to .18n.dart.
For example, if your widget is in file my_widget.dart,
the translations could be in file my_widget.i18n.dart
You must then remove the previous default import, and instead import your own translation file:
import 'my_widget.i18n.dart';
Your translation file itself will be something like this:
import 'package:i18n_extension/i18n_extension.dart';

extension Localization on String {

  static var t = Translations("en_us") +
    {
      "en_us": "Hello, how are you?",
      "pt_br": "Olá, como vai você?",
      "es": "¿Hola! Cómo estás?",
      "fr": "Salut, comment ca va?",
      "de": "Hallo, wie geht es dir?",
    };

  String get i18n => localize(this, t);
}
The above example shows a single translatable string, translated to American English,
Brazilian Portuguese, and general Spanish, French and German.
You can, however, translate as many strings as you want, by simply adding more
translation maps:
import 'package:i18n_extension/i18n_extension.dart';

extension Localization on String {

    static var t = Translations("en_us") +
        {
          "en_us": "Hello, how are you?",
          "pt_br": "Olá, como vai você?",
        } +
        {
          "en_us": "Hi",
          "pt_br": "Olá",
        } +
        {
          "en_us": "Goodbye",
          "pt_br": "Adeus",
        };

  String get i18n => localize(this, t);
}
Strings themselves are the translation keys
The locale you pass in the Translations() constructor is called the default locale.
For example, in Translations("en_us") the default locale is en_us.
All translatable strings in the widget file should be in the language of that locale.
The strings themselves are used as keys when searching for translations to the other locales.
For example, in the Text below, "Hello, how are you?" is both the translation to English,
and the key to use when searching for its other translations:
Text("Hello, how are you?".i18n)
If any translation key is missing from the translation maps, the key itself will be used,
so the text will still appear in the screen, untranslated.
If the translation key is found, it will choose the language according to the following rules:
-
It will use the translation to the exact current locale, for example
en_us. -
If this is absent, it will use the translation to the general language of the current locale,
for exampleen. -
If this is absent, it will use the translation to any other locale with the same language,
for exampleen_uk. -
If this is absent, it will use the key itself as the translation.
Managing keys
Other translation packages ask you to define key identifiers for each translation,
and use those. For example, the above text key could be helloHowAreYou or simply greetings.
And then you could access it like this: MyLocalizations.of(context).greetings.
However, having to define identifiers is not only a boring task, but it also forces you
to navigate to the translation if you need to remember the exact text of the widget.
With i18n_extension you can simply type the text you want and that's it.
If some string is already translated and you later change it in the widget file,
this will break the link between the key and the translation map.
However, i18n_extension is smart enough to let you know when that happens,
so it's easy to fix. You can even add this check to tests, as to make sure all translations are
linked and complete.
When you run your app or tests, each key not found will be recorded to the static set
Translations.missingKeys. And if the key is found but there is no translation to the
current locale, it will be recorded to Translations.missingTranslations.
You can manually inspect those sets to see if they're empty, or create tests to do that
automatically, for example:
expect(Translations.missingKeys, isEmpty);
expect(Translations.missingTranslations, isEmpty);
Note: You can disable the recording of missing keys and translations by doing:
Translations.recordMissingKeys = false;
Translations.recordMissingTranslations = false;
Another thing you may do if you want, is to throw an error if any translation is missing.
To that end, inject callbacks into Translations.missingKeyCallback and
Translations.missingTranslationCallback. For example:
Translations.missingKeyCallback = (key, locale)
  => throw TranslationsException("Translation key in '$locale' is missing: '$key'.");

Translations.missingTranslationCallback = (key, locale)
  => throw TranslationsException("There are no translations in '$locale' for '$key'.");
Or instead of throwing you could log the problem,
or send an email to the person responsible for the translations.
Defining translations by language instead of by key
As explained, by using the Translations() constructor
you define each key and then provide all its translations at the same time.
This is the easiest way when you are doing translations manually,
for example, when you speak English and Spanish and are creating yourself the translations to your app.
However, in other situations, such as when you are hiring professional translation services
or crowdsourcing translations, it may be easier if you can provide the translations by locale/language,
instead of by key. You can do that by using the Translations.byLocale() constructor.
static var t = Translations.byLocale("en_us") +
    {
      "en_us": {
        "Hi.": "Hi.",
        "Goodbye.": "Goodbye.",
      },
      "es_es": {
        "Hi.": "Hola.",
        "Goodbye.": "Adiós.",
      }
    };
You can also add maps using the + operator:
static var t = Translations.byLocale("en_us") +
    {
      "en_us": {
        "Hi.": "Hi.",
        "Goodbye.": "Goodbye.",
      },
    } +
    {
      "es_es": {
        "Hi.": "Hola.",
        "Goodbye.": "Adiós.",
      }
    };
Note above, since "en_us" is the default locale you don't need to provide translations for those.
Combining translations
To combine translations you can use the * operator. For example:
var t1 = Translations("en_us") +
    {
      "en_us": "Hi.",
      "pt_br": "Olá.",
    };

var t2 = Translations("en_us") +
    {
      "en_us": "Goodbye.",
      "pt_br": "Adeus.",
    };

var translations = t1 * t2;

print(localize("Hi.", translations, locale: "pt_br");
print(localize("Goodbye.", translations, locale: "pt_br");
Translation modifiers
Sometimes you have different translations that depend on a number quantity.
Instead of .i18n you can use .plural() and pass it a number. For example:
int numOfItems = 3;
return Text("You clicked the button %d times".plural(numOfItems));
This will be translated, and if the translated string contains %d it will be replaced by the number.
Then, your translations file should contain something like this:
static var t = Translations("en_us") +
  {
    "en_us": "You clicked the button %d times"
        .zero("You haven't clicked the button")
        .one("You clicked it once")
        .two("You clicked a couple times")
        .many("You clicked %d times")
        .times(12, "You clicked a dozen times"),
    "pt_br": "Você clicou o botão %d vezes"
        .zero("Você não clicou no botão")
        .one("Você clicou uma única vez")
        .two("Você clicou um par de vezes")
        .many("Você clicou %d vezes")
        .times(12, "Você clicou uma dúzia de vezes"),
  };
Custom modifiers
You can actually create any modifiers you want.
For example, some languages have different translations for different genders.
So you could create .gender() that accepts Gender modifiers:
enum Gender {they, female, male}

int gnd = Gender.female;
return Text("There is a person".gender(gnd));
Then, your translations file should use .modifier() and localizeVersion() like this:
static var t = Translations("en_us") +
  {
    "en_us": "There is a person"
        .modifier(Gender.male, "There is a man")
        .modifier(Gender.female, "There is a woman")
        .modifier(Gender.they, "There is a person"),
    "pt_br": "Há uma pessoa"
        .modifier(Gender.male, "Há um homem")
        .modifier(Gender.female, "Há uma mulher")
        .modifier(Gender.they, "Há uma pessoa"),
  };

String gender(Gender gnd) => localizeVersion(gnd, this, t);
Direct use of translation objects
If you have a translation object you can use the localize function directly to perform translations:
var translations = Translations("en_us") +
    {
      "en_us": "Hi",
      "pt_br": "Olá",
    };

// Prints "Hi".
print(localize("Hi", translations, locale: "en_us");

// Prints "Olá".
print(localize("Hi", translations, locale: "pt_br");

// Prints "Hi".
print(localize("Hi", translations, locale: "not valid");
Changing the default locale
To change the current locale, do this:
I18n.of(context).locale = Locale("pt_BR");
To return the current locale to the system default, do this:
I18n.of(context).locale = null;
To read the current locale, do this:
Locale defaultLocale = I18n.of(context).locale;
Note: This will change the current locale only for the i18n_extension, and not for Flutter as a whole.
Importing and exporting
This package is optimized so that you can easily create and manage all of your translations yourself, by hand.
However, for large projects with big teams you probably need to follow a more involved process:
Export all your translatable strings to files
in some external format your professional translator or your crowdsourcing tool uses (see formats below).
Continue developing your app while waiting for the translations. Import the translation files into the project and
test the app in each language you added. Repeat the process as needed, translating just the changes between each
app revision. As necessary, perform additional localization steps yourself.
Importing and exporting is easy to do, because the Translation constructors use maps as input.
So you can simply generate maps from any file format,
and then use the Translation() or Translation.byLocale() constructors to create the translation objects.
Formats
The following formats may be used with translations:
-
ARB: This is based on JSON, and is the default format for Flutter localizations.
https://github.com/google/app-resource-bundle/wiki/ApplicationResourceBundleSpecification -
ICU: https://format-message.github.io/icu-message-format-for-translators/
-
XLIFF: This is based in XML. https://en.wikipedia.org/wiki/XLIFF
-
CSV: You can open this with Excel, save it in .XLSX and edit it there.
However, beware not to export it back to CSV with the wrong settings
(using something else than UTF-8 as encoding).
https://en.wikipedia.org/wiki/Comma-separated_values -
JSON: Can be used, however it lacks specific features for translation, like plurals and gender.
-
YAML: Can be used, however it lacks specific features for translation, like plurals and gender.
Note: I need help to create import methods for all those formats above.
If you want to help, please PR here: https://github.com/marcglasberg/i18n_extension.