Awesome Aurora Gradient
Provides a simple but powerful gradient extension method that can be used on Containers or DecorationImages.
Getting started
In the pubspec.yaml of your flutter project, add the following dependency:
dependencies:
  ...
  aurora_ui_gradient: <latest_version>
In your library add the following import:
import 'package:aurora_ui_gradient/aurora_ui_gradient.dart';
For help getting started with Flutter, view the online [documentation][flutter_documentation].
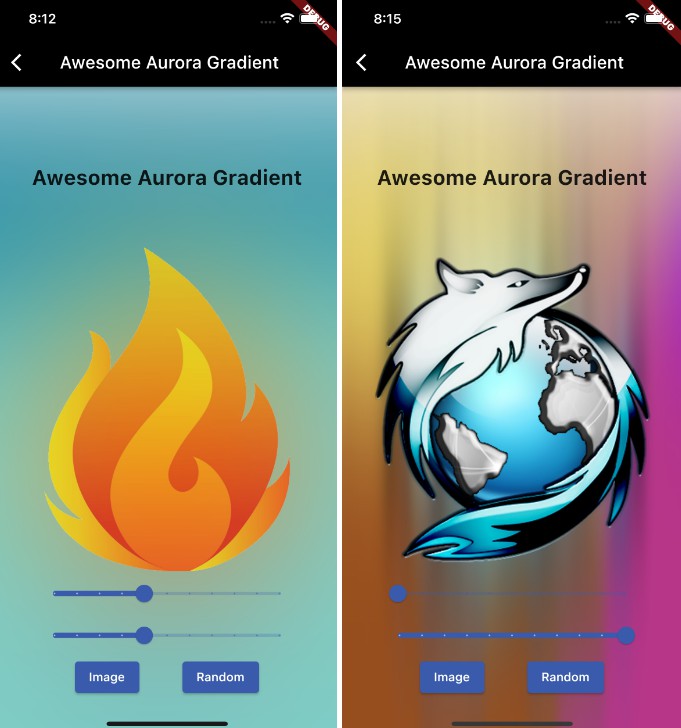
Gallery


How to use it

Let’s say we want to generate something like this image above. here is a simple way of doing it
its a container with .asAwesomeAurora() extension method.
You simply create a container and add .asAwesomeAurora()
Container(
      height: MediaQuery.of(context).size.height,
      width: MediaQuery.of(context).size.width,
    ).asAwesomeAurora();
This will generate a random background. to get the actual values that are generated randomly to use in your code, you can add debug: true, like this:
.asAwesomeAurora(debug: true);
and then you can keep refreshing the page until you find a pattern you like. because of the debug flag, you can find the configuration in the debug console on vscode, it looks like this

Now you have a final asAwesomeAurora object that looks something like this
.asAwesomeAurora(shiftX: 100.0, shiftY: 6.713037223479337, auroraObjects: [
      AuroraObjects(color: Color(0xfe703bc9), size: 2.0, x: 0.5, y: 0.5),
      AuroraObjects(
          color: Color(0xfe15ad81),
          size: 0.20434975310185255,
          x: 0.4107773793760572,
          y: 0.7115949484263953),
      AuroraObjects(
          color: Color(0xfe7a2598),
          size: 0.05583251849162163,
          x: 0.35623824913909286,
          y: 0.9970802979115129),
      AuroraObjects(
          color: Color(0xfed77237),
          size: 0.529962871028804,
          x: 0.8965277962474901,
          y: 0.7637832790723679),
      AuroraObjects(
          color: Color(0xfe715f1e),
          size: 0.5361927815073029,
          x: 0.03585087116056085,
          y: 0.4395169259099354),
      AuroraObjects(
          color: Color(0xfe7bb8ef),
          size: 0.48439512870067514,
          x: 0.23393248482439866,
          y: 0.5842477635926363),
    ]);
You can use this as-is, or you can convert it into a list of AuroraObjects which you pass to the .asAurora() method. it could look like this
List<AuroraObjects> auroraObjects = [
    AuroraObjects(
          color: Color(0xfe15ad81),
          size: 0.20434975310185255,
          x: 0.4107773793760572,
          y: 0.7115949484263953),
      AuroraObjects(
          color: Color(0xfe7a2598),
          size: 0.05583251849162163,
          x: 0.35623824913909286,
          y: 0.9970802979115129),

];
place the list somewhere in your class or build method, and use it like this:
Container(
      height: MediaQuery.of(context).size.height,
      width: MediaQuery.of(context).size.width,
    ).asAwesomeAurora(shiftX: 100.0, shiftY: 6.713037223479337, auroraObjects: auroraObjects);
The final code would/could look something like this
import 'package:flutter/material.dart';
import 'package:awesome_aurora_gradient/awesome_aurora_gradient.dart';

class ExampleSimplest extends StatelessWidget {
   ExampleSimplest({Key? key}) : super(key: key);

  List<AuroraObjects> auroraObjects = [
    AuroraObjects(color: Color(0xfe703bc9), size: 2.0, x: 0.5, y: 0.5),
    AuroraObjects(
        color: Color(0xfe15ad81),
        size: 0.20434975310185255,
        x: 0.4107773793760572,
        y: 0.7115949484263953),
    AuroraObjects(
        color: Color(0xfe7a2598),
        size: 0.05583251849162163,
        x: 0.35623824913909286,
        y: 0.9970802979115129),
    AuroraObjects(
        color: Color(0xfed77237),
        size: 0.529962871028804,
        x: 0.8965277962474901,
        y: 0.7637832790723679),
    AuroraObjects(
        color: Color(0xfe715f1e),
        size: 0.5361927815073029,
        x: 0.03585087116056085,
        y: 0.4395169259099354),
    AuroraObjects(
        color: Color(0xfe7bb8ef),
        size: 0.48439512870067514,
        x: 0.23393248482439866,
        y: 0.5842477635926363)
  ];

  @override
  Widget build(BuildContext context) {
    return Container(
      height: MediaQuery.of(context).size.height,
      width: MediaQuery.of(context).size.width,
    ).asAwesomeAurora(
        shiftX: 100.0, shiftY: 6.713037223479337, auroraObjects: auroraObjects);
  }
}
There are many ways of using this method, but clone the repo and take a look in the example which have various ways of using this effect on containers, decoration boxes, images and images with shadows
Bonus content for the elitist
In this package, you will also find an asShadow method. example:
FlutterLogo(
                      size: 200,
                    ).asShadow(
                        shiftX: 3, shiftY: 3, offset: const Offset(6, 6)),
With this and .asAwesomeAurora you can create something quite complex like this

This is a FlutterLogo() (could be a PNG with transparent background) and shader mask and .asShadow. the code looks like this
 Stack(
              children: [
                SizedBox(
                  height: 300,
                  width: MediaQuery.of(context).size.width,
                  // color: Colors.red,
                ).asAwesomeAurora(shiftX: _shiftx, shiftY: _shifty),
                ShaderMask(
                    shaderCallback: (rect) {
                      return const LinearGradient(
                        begin: Alignment.topCenter,
                        end: Alignment.bottomCenter,
                        colors: [Colors.black, Colors.transparent],
                      ).createShader(
                          Rect.fromLTRB(0, 50, rect.width, rect.height));
                    },
                    blendMode: BlendMode.dstIn,
                    child: Container(
                      height: 301,
                      width: MediaQuery.of(context).size.width,
                      color: const Color.fromARGB(255, 255, 255, 255),
                    )),
                Positioned(
                  top: 0,
                  bottom: 0,
                  left: 0,
                  right: 0,
                  child: Center(
                    child: FlutterLogo(
                      size: 200,
                    ).asShadow(
                        shiftX: 3, shiftY: 3, offset: const Offset(6, 6)),
                    // child: Image.asset(
                    //   'lib/assets/images/yourimage.png',
                    //   width: 200,
                    //   height: 200,
                    // ).asShadow(
                    //     shiftX: 3, shiftY: 3, offset: const Offset(5, 3)),
                  ),
                )
              ],
            ),
In the commented section of this code snippet, you can find an image example as well.
Other use cases
Too many to list, only your fantasy (and code skills) will limit you.. here is an AppBar

code example for the appbar
 appBar: AppBar(
          title: const Text(
            "Awesome Aurora Gradient Gallery",
            style: TextStyle(color: Colors.white),
          ),
          flexibleSpace: Container(
            child: const SizedBox(
              width: 200,
              height: 160,
            ).asAwesomeAurora(
                shiftX: 100,
                shiftY: 100,
                width: MediaQuery.of(context).size.width,
                height: 70),

          )),
The constructor
The constructor looks like this
asAwesomeAurora({
    List<AuroraObjects>? auroraObjects = const [],
    List<ColorScheme>? colorScheme,
    Clip clipBehaviour = Clip.antiAlias,
    TileMode tileMode = TileMode.clamp,
    CustomClipper<Path>? clipper,
    double shiftX = 0,
    double shiftY = 0,
    double width = 0,
    double height = 0,
    bool? debug,
  })
*** colorScheme is new and experimental, might be changed in near future
*** recommended shift values are 80-120, but you can experiement with higher or lower values
*** Usually you can leave out width and height as it will take the size of its parent. but if it doesnt fit your scenario, you can use width and height or wrap with a constrained widget
*** put debug = false in production
*** clipper are optional and used only for special cases, if you need this, you will know it, else just ignore it
The AuroraObjects look like this
class AuroraObjects {
  Color color;
  double x;
  double y;
  double size;
  double shiftX;
  double shiftY;
  AuroraObjects(
      {required this.color,
      required this.size,
      required this.x,
      required this.y,
      this.shiftX = 0,
      this.shiftY = 0});
}
x and y are positions (0,0 is top left corner, 1,1 is bottom right), so for example if you want to place an object on the middle of the screen and about half the size, it would look like this.
 AuroraObjects(
        color: Color(0xfe15ad81),
        size: 0.5,
        x: 0.5,
        y: 0.5)
So ideally if you want to create a awesome looking gradient, you would place object spread out on the canvas and pass ShiftX, shiftY values in the range of 80-120, that will result in a nice mix of colors that covers the entire canvas
How it works
I was inspired to do this package after watching a Figma tutorial on youtube and thought I could do this programmatically with dart & flutter and in some cases, it would be more convenient. it’s just some colored graphic objects which I blur and then add some backdrop filter. look in the package source code if you want to see how it works in detail
And remember To click like if you like this package, that will inspire me (and others) to publish more packages.
More examples