![]()
Features
- Reactive state management
- Effective dependency injection
- Lifecycle management for widget controllers
- Widget builders for building reactive UI components
- Intuitive testing (no setup/teardown required), dedicated testing library super_test
Getting started
Add Super to your pubspec.yaml file:
dependencies:
  flutter_super:
Import the Super package into your project:
import 'package:flutter_super/flutter_super.dart';
Usage
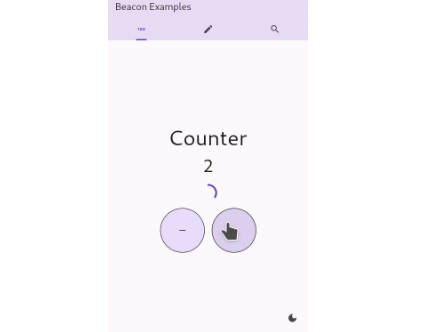
Counter App

Counter App Test

Lets break down the Counter App Example.
main.dart
The main.dart file serves as the entry point for the application. It sets up the necessary framework for the project by wrapping the root widget with SuperApp, which enables the Super framework.
void main() {
  runApp(
    // Adding SuperApp enables the framework for the project
    const SuperApp(child: MyApp()), // Step 1
  );
}
MyApp is the root widget of the application. It is a stateless widget that returns a MaterialApp as its child. The MaterialApp sets the home view of the application to be HomeView.
// Define the root widget of the application
class MyApp extends StatelessWidget {
  const MyApp({super.key});

  @override
  Widget build(BuildContext context) {
    return const MaterialApp(home: HomeView());
  }
}
HomeController is a controller class that extends SuperController. It manages the state and logic for the counter functionality in the application. It declares an RxInt object _count to represent the count value and provides a getter method count to access the current count value. It also defines an increment method to increase the count value by 1. The onDisable method is overridden to dispose of the _count object when the controller is disabled.
/// The SuperController mixin class allows you to define the
/// lifecycle of your controller classes based on a [SuperWidget].
class HomeController extends SuperController { // Step 2
  // Declare Rx object as `final` for Immutability
  final _count = 0.rx; // RxInt(0);

  int get count => _count.value;

  void increment() { // Step 3
    _count.value++;
  }

  @override
  void onDisable() {
    _count.dispose(); // Dispose Rx object.
    super.onDisable();
  }
}
HomeView is a widget that displays the counter and provides an increment button. It extends SuperWidget<HomeController> to initialize the HomeController as its controller. It overrides the initController method to create an instance of HomeController.
class HomeView extends SuperWidget<HomeController> { // Step 4
  const HomeView({super.key});

  @override // Initialize the Widget Controller
  HomeController initController() => HomeController();

  @override
  Widget build(BuildContext context) {
    return Scaffold(
      appBar: AppBar(title: const Text('Counter example')),
      body: Center(
        // SuperBuilder is a widget that listens to Rx objects used in
        // its builder method and rebuilds only when the state changes.
        child: SuperBuilder( // Step 5
          builder: (context) {
            // controller is the instance getter for the Controller of
            // the widget
            return Text(
              '${controller.count}',
              style: Theme.of(context).textTheme.displayLarge,
            );
          },
        ),
      ),
      floatingActionButton: FloatingActionButton(
        // Increment the count state by calling the increment() method
        onPressed: () => controller.increment(),
        child: const Icon(Icons.add),
      ),
    );
  }
}
By separating the logic into the HomeController and the UI into the HomeView, the application achieves a clear separation of concerns between the business logic layer and the presentational layer. The HomeView widget is responsible for rendering the UI based on the state provided by the HomeController, while the HomeController handles the underlying logic and state management for the counter functionality.
Super Framework APIs
SuperApp
A stateful widget that represents the root of the Super framework. The [child] parameter is required and represents the main content of the app.
The [mocks] parameter is an optional list of objects used for mocking dependencies during testing.
The mocks property provides a way to inject mock objects into the application’s dependency graph during testing.
These mock objects can replace real dependencies, such as database connections or network clients, allowing for controlled and predictable testing scenarios.
Important: When using the mocks property, make sure to provide instantiated mock objects, not just their types.
For example, instead of [MockAuthRepo], use [MockAuthRepo()] to ensure that the mock object is used.
Adding the type without instantiating the mock object will result in the mock not being utilized.
When [testMode] is set to true, the Super framework is activated in test mode.
Test mode can be used to enable additional testing features or behaviors specific to the Super framework.
By default, test mode is set to false.
The [autoDispose] parameter is an optional boolean value that determines whether the Super framework should automatically dispose of controllers, dependencies, and other resources when they are no longer needed.
By default, [autoDispose] is set to true, enabling automatic disposal.
Set [autoDispose] to false if you want to manually handle the disposal of resources in your application.
Example usage:
SuperApp(
  mocks: [
  MockAuthRepo(),
  MockDatabase(),
  ],
  testMode: true,
  autoDispose: true,
  child: const MyApp(),
);
SuperController
A mixin class that provides a lifecycle for controllers used in the application.
The SuperController mixin class allows you to define the lifecycle of your controller classes.
It provides methods that are called at specific points in the widget lifecycle, allowing you to initialize resources, handle events, and clean up resources when the controller is no longer needed. Since it is tied to the widget itself, the BuildContext of the widget is accessible from the controller after it is alive.
Example usage:
class SampleController extends SuperController {
  final _count = 0.rx; // RxInt(0);
  final _loading = false.rx; // RxBool(false);

  int get count => _count.value;
  bool get loading => _loading.value;

  @override
  void onAlive() {
    context.showTextSnackBar('Controller Alive');
  }

  void increment() {
    _count.value++;
  }

  void toggleLoading() {
    _loading.value = !_loading.value;
  }

  @override
  void onDisable() {
    _count.dispose(); // Dispose Rx object.
    _loading.dispose();
    super.onDisable();
  }
}
In the example above, SampleController extends SuperController and defines a count variable that is managed by an Rx object. The increment() method is used to increment the count value. The onDisable() method is overridden to dispose of the Rx object when the controller is disabled.
As seen in the SampleController above, a controller may contain multiple states required by it’s corresponding widget, however, for the sake of keeping a controller clean and focused, if there exists a state with multiple events, it is recommended to define an RxNotifier for that state.
Important: It is recommended to define Rx objects as private and only provide a getter for accessing the state.
This helps prevent the state from being changed outside of the controller, ensuring that the state is only modified through defined methods within the controller (e.g., increment() in the example).
SuperModel
A class that provides value equality checking for classes.
Classes that extend this class should implement the props getter, which returns a list of the class properties that should be used for equality checking.
Example usage:
class UserModel with SuperModel {
  UserModel(this.id, this.name);

  final int id;
  final String name;

  @override
  List<Object> get props => [id, name]; // Important
}

final _user = UserModel(1, 'Paul').rx;
final user2 = UserModel(1, 'Paul');

_user.value == user2; // true
_user.value = user2; // Will not trigger a rebuild
Widgets in the Super Framework
SuperWidget
A [StatelessWidget] that provides the base functionality for widgets that work with a [SuperController].
This widget serves as a foundation for building widgets that require a controller to manage their state and lifecycle.
By extending [SuperWidget] and providing a concrete implementation of [initController()], you can easily associate a controller with the widget. It also utilizes a controller getter which provides access to the associated controller for the widget.
Example Usage:
class MyWidget extends SuperWidget<MyController> {
  @override
  MyController initController() => MyController();

  // Widget implementation...
}
Important: It is recommended to use one controller per widget to ensure proper encapsulation and separation of concerns. Each widget should have its own dedicated controller for managing its state and lifecycle. This approach promotes clean and modular code by keeping the responsibilities of each widget and its associated controller separate.
If you have a widget that doesn’t require state management or interaction with a controller, it is best to use a vanilla [StatelessWidget] instead. Using a controller in a widget that doesn’t have any state could add unnecessary complexity and overhead.
SuperBuilder
The [SuperBuilder] widget allows you to rebuild a part of your UI in response to changes in an [Rx] object. It takes a [builder] callback function that receives a [BuildContext] and returns the widget to be built.
The [builder] callback will be invoked whenever the [Rx] object changes its value, triggering a rebuild of the widget. The [Rx] object can be accessed within the [builder] callback, allowing you to incorporate its value into your UI.
Example usage:
SuperBuilder(
  builder: (context) {
    // return widget here based on Rx state
  }
)
Important: You need to make use of an [Rx] object value in the builder method, otherwise it will result in an error.
Note: If you’d prefer to specify the Rx object outside the builder method, i.e you opted to make your Rx objects non-private then make use of the SuperConsumer widget.
The [buildWhen] parameter is an optional condition that determines whether the [builder] should be called when the [Rx] object changes.
If [buildWhen] evaluates to false, the [builder] will not be called, and the child widget will not be rebuilt.
Example usage:
SuperBuilder(
  buildWhen: () => controller.count > 3,
  builder: (context) {
    // return widget here based on Rx state
  }
)
SuperConsumer
[SuperConsumer] is a StatefulWidget that listens to changes in a [Rx] object and rebuilds its child widget whenever the [Rx] object’s state changes.
The [SuperConsumer] widget takes a [builder] function, which is called whenever the [Rx] object changes. The [builder] function receives the current [BuildContext] and the latest state of the [Rx] object, and returns the widget tree to be built.
Example usage:
final counter = CounterNotifier();

// ...

SuperConsumer<int>(
  rx: counter,
  builder: (context, state) {
    return Text('Count: $state');
  },
)
In the above example, a [SuperConsumer] widget is created and given a CounterNotifier object called counter. Whenever the state of counter changes, the builder function is called with the latest state, and it returns a [Text] widget displaying the count.
SuperListener
The [SuperListener] widget listens to changes in the provided rx object and calls the [listener] callback when the rx object changes its value.
The [listener] callback is called once when the rx object changes its value.
The [child] parameter is an optional child widget to be rendered by this widget.
The [listenWhen] parameter is an optional condition that determines whether
the [listener] should be called when the rx object changes. If
[listenWhen] evaluates to true, the [listener]
will be called; otherwise, it will be skipped.
Example usage:
SuperListener<int>(
  listen: () => controller.count;
  listenWhen: (count) => count > 5,
  listener: (context) {
    // Handle the state change here
  }, // Will only call the listener if count is greater than 5
  child: Text('Counter'),
)
Important: You need to make use of an [Rx] object value in the listen parameter, otherwise it will result in an error.
AsyncBuilder
A stateful widget that builds itself based on the state of an asynchronous computation.
The [builder] parameter is a required callback function that returns the widget to be built.
The [future] parameter represents an asynchronous computation that will trigger a rebuild when completed.
The [stream] parameter represents an asynchronous data stream that will trigger a rebuild when new data is available.
The [loading] parameter represents a widget to display while the asynchronous computation is in progress.
The [error] parameter represents a widget builder that constructs an error widget when an error occurs in the asynchronous computation.
The [initialData] parameter represents the initial data that will be used to create the snapshots until a non-null [future] or [stream] has completed.
Example usage:
AsyncBuilder(
    builder: (data) => ,
    error: (error, stackTrace) => ,
    loading: ,
),
Important: Either a future or a stream should be used at a time, using both at the same time will result in an error.
Rx Types
RxT
A reactive container for holding a value of type T.
The RxT class is a specialization of the Rx class that represents a reactive value. It allows you to store and update a value of type T and automatically notifies its listeners when the value changes.
Example usage:
final _counter = RxT<int>(0); // same as RxInt(0) or 0.rx

void incrementCounter() {
  _counter.value++;
}
RxT SubTypes
- RxInt
- RxString
- RxBool
- RxDouble
It is best used for local state i.e state used in a single controller.
Note: When using the RxT class, it is important to call the dispose() method on the object when it is no longer needed to prevent memory leaks. This can be done using the onDisable method of your controller.
RxNotifier
An abstract base class for creating reactive notifiers that manage a state of type T.
The RxNotifier class provides a foundation for creating reactive notifiers that encapsulate a piece of immutable state and notify their listeners when the state changes. Subclasses of RxNotifier must override the watch method to provide the initial state and implement the logic for updating the state.
Example usage:
class CounterNotifier extends RxNotifier<int> {
  @override
  int watch() {
    return 0; // Initial state
  }

  void increment() {
    state++; // Update the state
  }
}

final counter = CounterNotifier();
It is best used for global state i.e state used in multiple controllers but it could also be used for a single controller to abstract a state and its events e.g if a state has a lot of events, rather than complicating your controller, you could use an RxNotifier for that singular state instead.
Note: When using the RxNotifier class, it is important to call the dispose() method on the object when it is no longer needed to prevent memory leaks. This can be done using the onDisable method of your controller.
Rx Collections
These are similar to RxT but do not require the use of .value, they extend the functionality of the regular dart collections by being reactive.
- RxMap
- RxSet
- RxList
Dependency Injection
of
Retrieves the instance of a dependency from the manager and starts the controller if the dependency extends SuperController.
Super.of<T>();
init
Initializes and retrieves the instance of a dependency, or creates a new instance if it doesn’t exist.
Super.init<T>(T instance);
create
Creates a singleton instance of a dependency and registers it with the manager.
Super.create<T>(T instance, {bool lazy = false});
delete
Deletes the instance of a dependency from the manager. If autoDispose is set to false, [force] must be set to true to delete resources.
Super.delete<T>({String? key, bool force = false});
deleteAll
Deletes all instances of dependencies from the manager. If autoDispose is set to false, [force] must be set to true to delete resources.
Super.deleteAll({bool force = false});
Useful APIs
Error Handling
An extension method for handling the result of a [Future] with success and error callbacks.
The result method allows you to provide two callbacks: one for handling the success case when the [Future] completes successfully, and one for handling the error case when an exception occurs.
Example usage:
Future<int> fetchNumber() async {
  // Simulating an asynchronous operation
  await Future.delayed(Duration(seconds: 2));

  // Simulating an error
  throw Failure('Failed to fetch number');
}

void handleSuccess(int number) {
  print('Fetched number: $number');
}

void handleError(Failure error) {
  print('Error occurred: ${error.message}');
}

void main() {
  fetchNumber().result(handleError, handleSuccess);

  // or

  final request = fetchNumber();

  request.result<Failure, int>(
  (e) => print('Error occurred: ${e.message}');  // could replace `e` with error
  (s) => print('Fetched number: $s');            // could replace `s` with number
  );
}
context.read
Works exactly like Super.of<T>() but with BuildContext and is familiar
context.read<T>();
Additional Information
Super Structure
For a clean way to structure your projects, check out Super Structure.
For more information on all the APIs and more, check out the API reference.
Requirements
- Dart 3: >= 3.0.0
Maintainers
Dev Note
Hi there, DrDejaVu here! I have put in considerable effort to structure and document the Super framework in a readable and understandable manner. I wanted to create a framework that aligns with the high standards set by the Flutter Team, who have done an incredible job of documenting the Flutter framework.
While developing with Super, you may notice similarities in API names with other state management solutions such as Bloc and others. This is because I have drawn inspiration from these solutions and leveraged my previous experience with them to create Super. By adopting familiar concepts and naming conventions, I aimed to make the learning curve smoother for developers already familiar with these state management solutions.
I hope you find the Super framework as pleasing and easy to work with as I intended it to be. If you have any feedback or suggestions for improvement, please don’t hesitate to reach out. Happy coding!
Best regards, DrDejaVu
Credits
All credits to God Almighty who guided me through the project.