CarPlay with Flutter ?

Flutter Apps now on Apple CarPlay! flutter_carplay aims to make it safe to use iPhone apps made with Flutter in the car by integrating with CarPlay. CarPlay takes the things you want to do while driving and puts them on the car’s built-in display.
Apple announced some great features in iOS 14, one of which is users download CarPlay apps from the App Store and use them on iPhone like any other app. When an iPhone with a CarPlay app is connected to a CarPlay vehicle, the app icon appears on the CarPlay home screen. CarPlay apps are not separate apps—you add CarPlay support to an existing app.
Your app uses the CarPlay framework to present UI elements to the user. iOS manages the display of UI elements and handles the interface with the car. Your app does not need to manage the layout of UI elements for different screen resolutions, or support different input hardware such as touchscreens, knobs, or touch pads.
It supports only iOS 14.0+. For general design guidance, see Human Interface Guidelines for CarPlay Apps.
Overview

Before you begin CarPlay integration, you must carefully read this section.
The official App Programming Guidelines from Apple is the most valuable resource for understanding the needs, limits, and capabilities of CarPlay Apps. This documentation is a 49-page which clearly spells out the some actions required, and you are strongly advised to read it. If you are interested in a CarPlay System, learn more about the MFi Program.
Templates
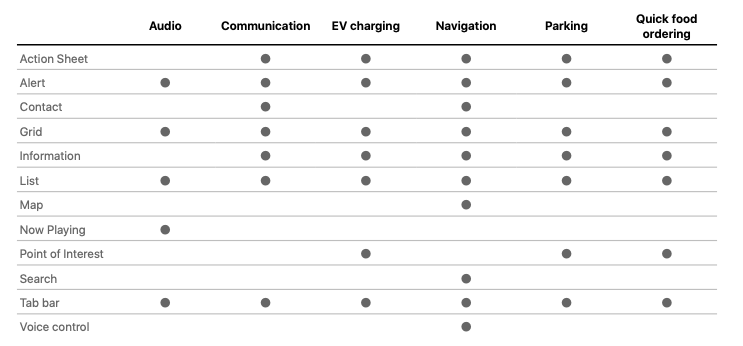
CarPlay apps are built from a fixed set of user interface templates that iOS renders on the CarPlay screen. Each CarPlay app category can only use a restricted number of templates. Your app entitlement determines your access to templates.
Supports
flutter_carplay currently supports:
- Action Sheet Template
- Alert Template
- Grid Template
- List Template
- Tab Bar Template
By evaluating this information, you can request for the relevant entitlement from Apple.
Road Map
Since I don’t have some required entitlements, other templates will be supported in the future releases by flutter_carplay.
- Map
- Search
- Voice Control & “Hey Siri” for hands-free voice activation
- Information
- Contact
- Point of Interest
- Now Playing
Contributing
- Pull Requests are always welcome.
- Pull Request Reviews are even more welcome! I need help in testing.
- If you are interested in contributing more actively, please contact me at [email protected] Thanks!
- If you want to help in coding, join Slack Channel, so we can chat over there.
Requesting the CarPlay Entitlements
All CarPlay apps require a CarPlay app entitlement.
If you want to build, run and publish your app on Apple with CarPlay compatibility or test or share the app with others through the TestfFlight or AdHoc, you must first request Apple to approve your Developer account for CarPlay access. The process can take from a few days to weeks or even months. It depends on the type of Entitlement you are requesting.
To request a CarPlay app entitlement from Apple, go to https://developer.apple.com/contact/carplay and provide information about your app, including the CarPlay App Category. You must also agree to the CarPlay Entitlement Addendum.
With this project, you can start developing and testing through Apple’s CarPlay Simulator without waiting for CarPlay Entitlements. Apple will review your request. If your app meets the criteria for a CarPlay app, Apple will assign a CarPlay app entitlement to your Apple Developer Account and will notify you.
Whether you are running the app through a simulator or developing it for distribution, you must ensure that the relevant entitlement key is added to the Entitlements.plist file. You must create an Entitlements.plist file if you do not already have one.
After you receive the CarPlay Entitlement
After you receive the entitlement, you need to configure your Xcode project to use it, which involves several steps. You create and import a provisioning profile, and add an Entitlements.plist file. Your project’s code signing settings also require minor changes.
For more detailed instructions about how to create and import the CarPlay Provisioning Profile and add an Entitlements File to Xcode Project, go to Configure your CarPlay-enabled app with the entitlements it requires.
Disclaimer Before The Installation
You are about to make some minor changes to your Xcode project after installing this package. This is due to the fact that It requires bitcode compilation which is missing in Flutter. You will procedure that will relocate (we won’t remove or edit) some Flutter and its package engines. If you’re planning to add this package to a critical project for you, you should proceed cautiously.
Please check THE EXAMPLE PROJECT before you begin to the installation.
THE INSTALLATION STEPS MAY BE DIFFICULT OR MAY NOT WORK PROPERLY WITH A FEW PACKAGES IN YOUR CURRENT PROJECT THAT COMMUNICATE WITH THE FLUTTER ENGINE. IF YOU ARE NOT COMPLETELY SURE WHAT YOU ARE DOING, PLEASE CREATE AN ISSUE, SO THAT I CAN HELP YOU TO SOLVE YOUR PROBLEM OR EXPLAIN WHAT YOU NEED TO.
WHILE THE INSTALLATION PROGRESS, IF YOU TRY TO CHANGE ANYTHING (E.G. ANYTHING WORKS WITH FLUTTER ENGINE, ANYTHING IN GENERATED PLUGIN REGISTRANT SPECIFICALLY ITS LOCATION, ANY FILE NAME, ANY CLASS NAME, OR ANY OTHER FUNCTION THAT WORKS ON APPDELEGATE CLASS, TEMPLATE OR WINDOW APPLICATION DELEGATE SCENE NAMES USED IN INFO.PLIST, INCLUDED STORYBOARD NAMES, BUT NOT LIMITED TO THESE), YOU ARE MOST LIKELY TO ENCOUNTER IRREVERSIBLE ERRORS AND IT MAY DAMAGE TO YOUR PROJECT. I STRONGLY RECOMMEND THAT YOU SHOULD COPY YOUR EXISTING PROJECT BEFORE THE INSTALLATION.
Get Started
Requirement Actions after Installating the Package
- The iOS platform version must be set to 14.0. To make it global, navigate to
ios/Podfileand copy the first two lines:
# Uncomment this line to define a global platform for your project
+ platform :ios, '14.0'
- # platform :ios, '9.0'
After changing the platform version, execute the following command in your terminal to update your pod files:
// For Apple Silicon M1 chips:
$ cd ios && arch -x86_64 pod install --repo-update

// For Intel chips:
$ cd ios && pod install --repo-update
-
Open
ios/Runner.xcworkspacein Xcode. In your project navigator, openAppDelegate.swift.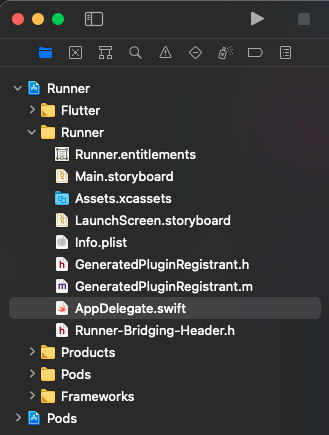
Delete the specified codes below from the application function in
AppDelegate.swift, and change it with the code below:
import UIKit
import Flutter

@UIApplicationMain
@objc class AppDelegate: FlutterAppDelegate {
override func application( _ application: UIApplication,
                        didFinishLaunchingWithOptions launchOptions: [UIApplication.LaunchOptionsKey: Any]?) -> Bool {
-   GeneratedPluginRegistrant.register(with: self)
-   return super.application(application, didFinishLaunchingWithOptions: launchOptions)
+   return true
}
}
-
Create a swift file named
SceneDelegate.swiftin the Runner folder (not in the xcode main project file) and add the code below:@available(iOS 13.0, *) class SceneDelegate: UIResponder, UIWindowSceneDelegate { var window: UIWindow? func scene(_ scene: UIScene, willConnectTo session: UISceneSession, options connectionOptions: UIScene.ConnectionOptions) { guard let windowScene = scene as? UIWindowScene else { return } window = UIWindow(windowScene: windowScene) let flutterEngine = FlutterEngine(name: "SceneDelegateEngine") flutterEngine.run() GeneratedPluginRegistrant.register(with: flutterEngine) let controller = FlutterViewController.init(engine: flutterEngine, nibName: nil, bundle: nil) window?.rootViewController = controller window?.makeKeyAndVisible() } }

-
One more step, open the
Info.plistfile whether in your favorite code editor or in the Xcode. I’m going to share the base code, so if you open in the Xcode, you can fill with the raw keys with the values.<key>UIApplicationSceneManifest</key> <dict> <key>UIApplicationSupportsMultipleScenes</key> <true /> <key>UISceneConfigurations</key> <dict> <key>CPTemplateApplicationSceneSessionRoleApplication</key> <array> <dict> <key>UISceneConfigurationName</key> <string>CarPlay Configuration</string> <key>UISceneDelegateClassName</key> <string>flutter_carplay.FlutterCarPlaySceneDelegate</string> </dict> </array> <key>UIWindowSceneSessionRoleApplication</key> <array> <dict> <key>UISceneConfigurationName</key> <string>Default Configuration</string> <key>UISceneDelegateClassName</key> <string>$(PRODUCT_MODULE_NAME).SceneDelegate</string> <key>UISceneStoryboardFile</key> <string>Main</string> </dict> </array> </dict> </dict>
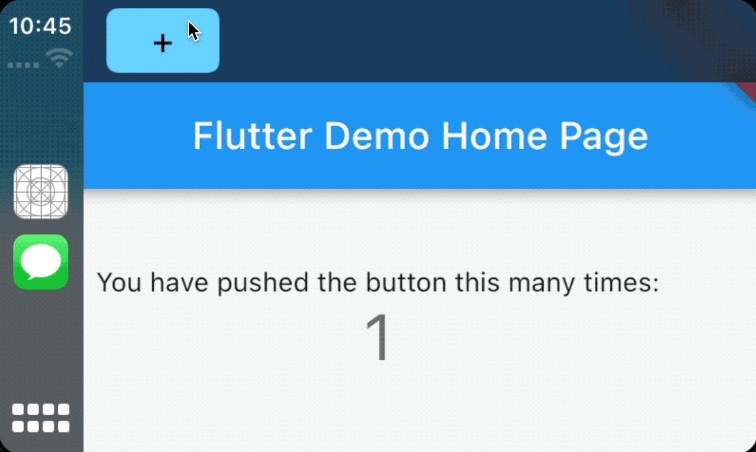
That’s it, you’re ready to build your first CarPlay app! ? ?
Usage & Features
Basic Usage
- Import the all classes that you need from just one file:
import 'package:flutter_carplay/flutter_carplay.dart';
- Initialize the CarPlay Controllers and set a root template for the CarPlay view hierarchy:
final FlutterCarplay _flutterCarplay = FlutterCarplay();

FlutterCarplay.setRootTemplate(
  rootTemplate: CPTabBarTemplate(
    templates: [
      CPListTemplate(
        sections: [
          CPListSection(
            items: [
              CPListItem(
                text: "Item 1",
                detailText: "Detail Text",
                onPress: (complete, self) {
                  self.setDetailText("You can change the detail text.. ?");
                  Future.delayed(const Duration(seconds: 1), () {
                    self.setDetailText("Customizable Detail Text");
                    complete();
                  });
                },
              ),
            ],
            header: "First Section",
          ),
        ],
        title: "Home",
        showsTabBadge: false,
        systemIcon: "house.fill",
      ),
    ],
  ),
  animated: true,
);
You can set a root template without initializing the CarPlay Controllers, but some callback functions may not work or most likely you will get an error.
It’s recommended that you should set the root template in the first initState of your app.
Listen Connection Changes
You can detect connection changes, such as when CarPlay is connected to iPhone, is in the background, or is completely disconnected.
/// Add the listener
_flutterCarplay.addListenerOnConnectionChange(onCarplayConnectionChange);

void onCarplayConnectionChange(CPConnectionStatusTypes status) {
  // Do things when carplay connection status is:
  // - CPConnectionStatusTypes.connected
  // - CPConnectionStatusTypes.background
  // - CPConnectionStatusTypes.disconnected
  // - CPConnectionStatusTypes.unknown
}

/// Remove the listener
_flutterCarplay.removeListenerOnConnectionChange();
CarPlay API Methods
CarPlay.setRootTemplate
Sets the root template of the navigation hierarchy. If a navigation hierarchy already exists, CarPlay replaces the entire hierarchy.
- rootTemplate is a template to use as the root of a new navigation hierarchy. If one exists, it will replace the current rootTemplate. Must be one of the type: CPTabBarTemplate, CPGridTemplate, CPListTemplate. If not, it will throw an TypeError.
- If animated is true, CarPlay animates the presentation of the template, but will be ignored this flag when there isn’t an existing navigation hierarchy to replace.
CarPlay cannot have more than 5 templates on one screen.
FlutterCarplay.setRootTemplate(
  rootTemplate: /* CPTabBarTemplate, CPGridTemplate or CPListTemplate */,
  animated: true,
);
CarPlay.push
Adds a template to the navigation hierarchy and displays it.
- template is to add to the navigation hierarchy. Must be one of the type: CPGridTemplate, CPListTemplate. If not, it will throw an TypeError.
- If animated is true, CarPlay animates the transition between templates.
There is a limit to the number of templates that you can push onto the screen. All apps are limited to pushing up to 5 templates in depth, including the root template.
FlutterCarplay.push(
  template: /* CPGridTemplate or CPListTemplate */,
  animated: true,
);
CarPlay.pop
Removes the top-most template from the navigation hierarchy.
- If animated is true, CarPlay animates the transition between templates.
- count represents how many times this function will occur.
FlutterCarplay.pop();
// OR
FlutterCarplay.pop(animated: true, count: 1);
CarPlay.popToRoot
Removes all of the templates from the navigation hierarchy except the root template.
- If animated is true, CarPlay animates the presentation of the template.
FlutterCarplay.popToRoot(animated: true);
CarPlay.popModal
Removes a modal template. Since CPAlertTemplate and CPActionSheetTemplate are both modals, they can be removed.
- If animated is true, CarPlay animates the transition between templates.
FlutterCarplay.popModal(animated: true);
CarPlay.connectionStatus
Getter for current CarPlay connection status. It will return one of CPConnectionStatusTypes as String.
FlutterCarplay.connectionStatus
Templates
CarPlay supports general purpose templates such as alerts, lists, and tab bars. They are used to display contents on the CarPlay screen from the app. The Developer Guide contains more information on the templates that Apple supports.
If you attempt to use a template not supported by your entitlement, an exception will occur at runtime.
Tab Bar Template
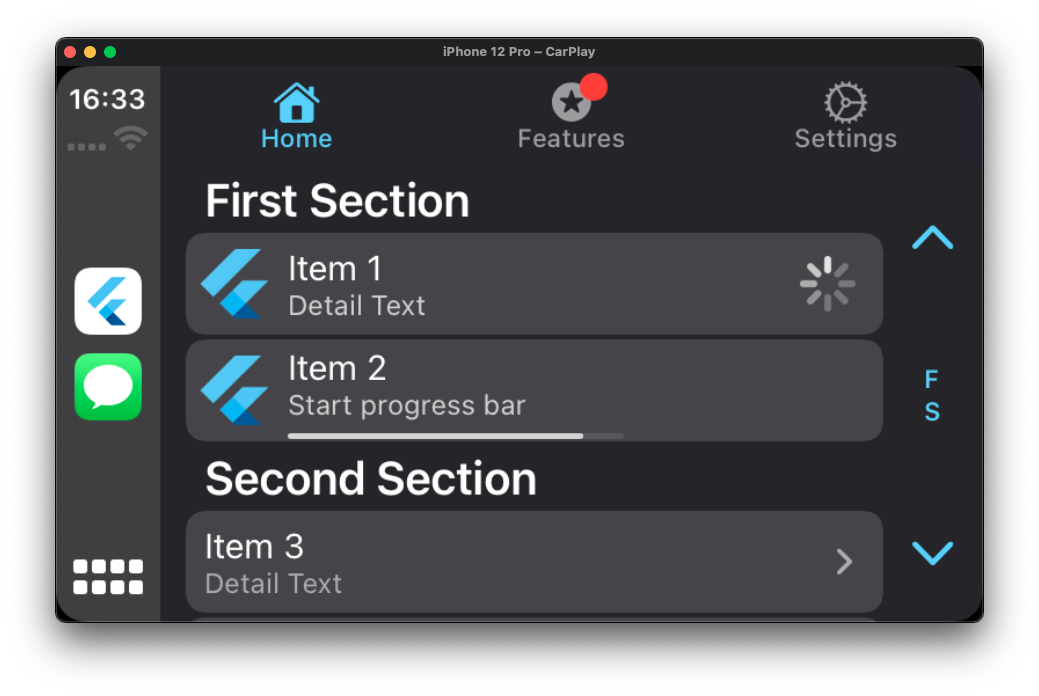
The tab bar is a multi-purpose container for other templates, with each template occupying one tab in the tab bar.
final CPTabBarTemplate tabBarTemplate = CPTabBarTemplate(
  templates: [
    CPListTemplate(
      sections: [
        CPListSection(
          items: [
            CPListItem(
              text: "Item 1",
              detailText: "Detail Text",
              onPress: (complete, self) {
                // Returns the self class so that the item
                // can be updated within self while loading
                self.setDetailText("You can change the detail text.. ?");
                // complete function stops the loading
                complete();
              },
              image: 'images/logo_flutter_1080px_clr.png',
            ),
            CPListItem(
              text: "Item 2",
              detailText: "Start progress bar",
              isPlaying: false,
              playbackProgress: 0,
              // asset name defined in pubspec.yaml
              image: 'images/logo_flutter_1080px_clr.png',
              onPress: (complete, self) {
                complete();
              },
            ),
          ],
          header: "First Section",
        ),
      ],
      title: "Home",
      showsTabBadge: false,
      systemIcon: "house.fill",
    ),
    CPListTemplate(
      sections: [],
      title: "Settings",
      // If there is no section in the list template,
      // empty view title and subtitle variants will be shown
      emptyViewTitleVariants: ["Settings"],
      emptyViewSubtitleVariants: [
        "No settings have been added here yet. You can start adding right away"
      ],
      showsTabBadge: false,
      systemIcon: "gear",
    ),
  ],
);

FlutterCarplay.setRootTemplate(rootTemplate: tabBarTemplate, animated: true);
Grid Template
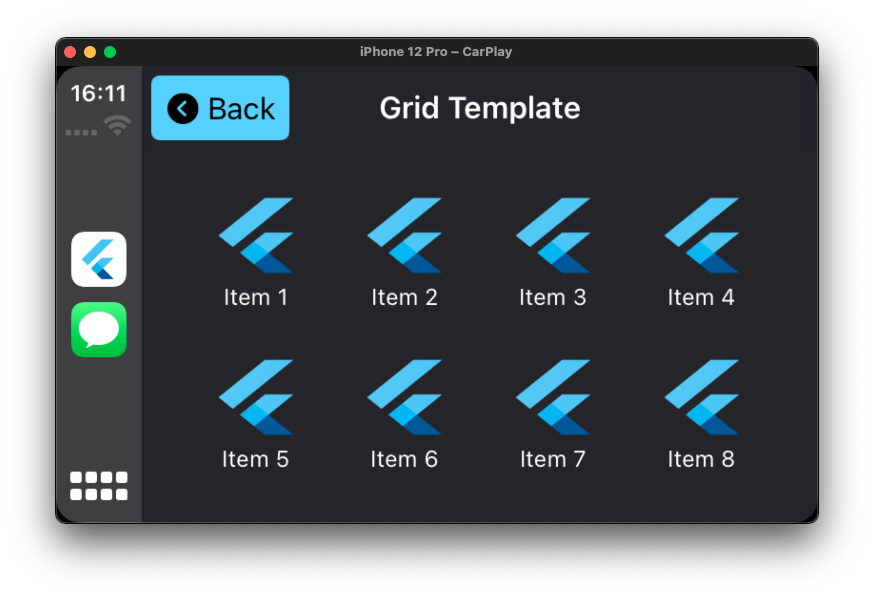
Grid Template is a specific style of menu that presents up to 8 items represented by an image and a title. Use the grid template to let people select from a fixed list of categories.
final CPGridTemplate gridTemplate = CPGridTemplate(
  title: "Grid Template",
  buttons: [
    for (var i = 1; i < 9; i++)
      CPGridButton(
        titleVariants: ["Item $i"],
        image: 'images/logo_flutter_1080px_clr.png',
        onPress: () {
          print("Grid Button $i pressed");
        },
      ),
  ],
);

FlutterCarplay.push(template: gridTemplate, animated: true);
// OR
FlutterCarplay.setRootTemplate(rootTemplate: gridTemplate, animated: true);
Alert Template
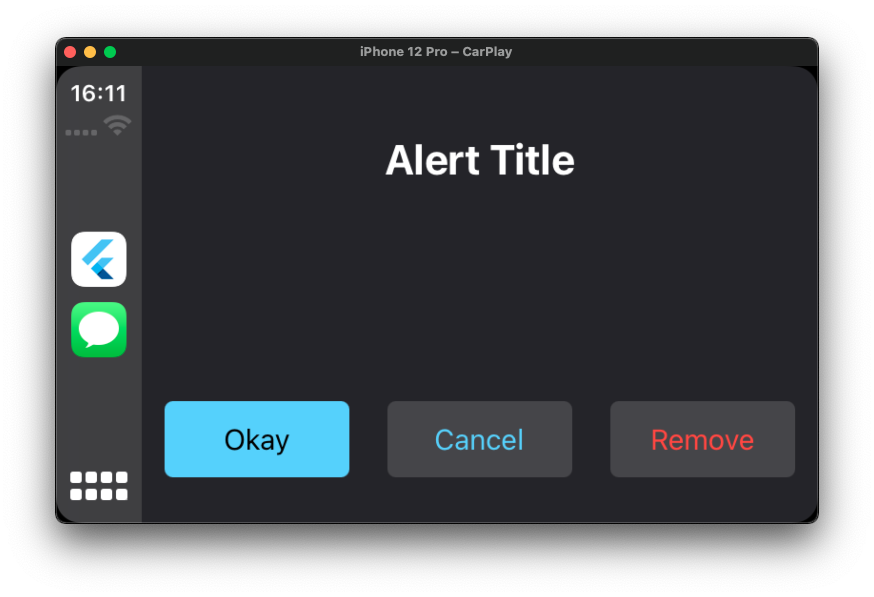
Alerts provide important information about your app’s status. An alert consists of a title and one or more buttons, depending on the type.
If underlying conditions permit, alerts can be dismissed programatically.
final CPAlertTemplate alertTemplate = CPAlertTemplate(
  titleVariants: ["Alert Title"],
  actions: [
    CPAlertAction(
      title: "Okay",
      style: CPAlertActionStyles.normal,
      onPress: () {
        print("Okay pressed");
        FlutterCarplay.popModal(animated: true);
      },
    ),
    CPAlertAction(
      title: "Cancel",
      style: CPAlertActionStyles.cancel,
      onPress: () {
        print("Cancel pressed");
        FlutterCarplay.popModal(animated: true);
      },
    ),
    CPAlertAction(
      title: "Remove",
      style: CPAlertActionStyles.destructive,
      onPress: () {
        print("Remove pressed");
        FlutterCarplay.popModal(animated: true);
      },
    ),
  ],
),

FlutterCarplay.showAlert(template: alertTemplate, animated: true);
Action Sheet Template
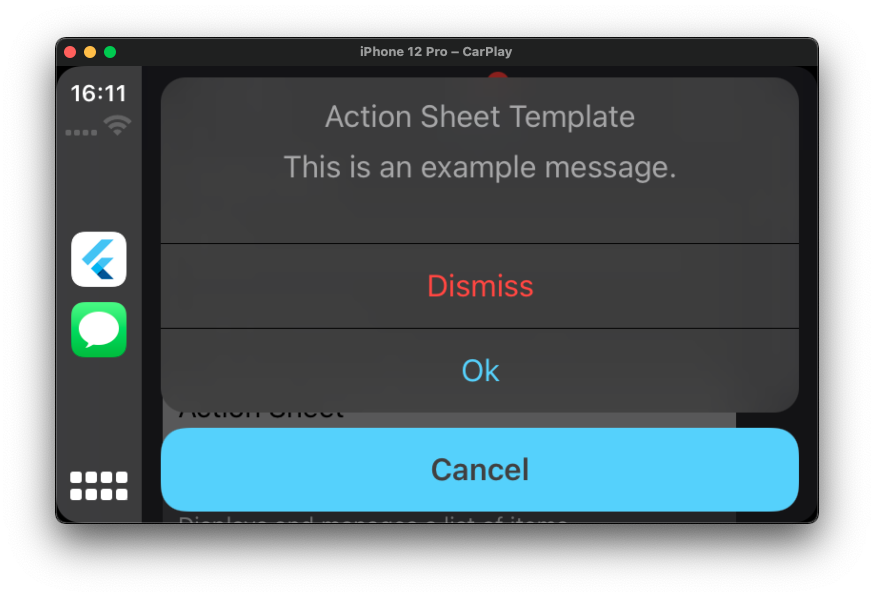
Action Sheet Template is a type of alert that appears when control or action is taken and gives a collection of options based on the current context.
Use action sheets to let people initiate tasks, or to request confirmation before performing a potentially destructive operation.
final CPActionSheetTemplate actionSheetTemplate = CPActionSheetTemplate(
  title: "Action Sheet Template",
  message: "This is an example message.",
  actions: [
    CPAlertAction(
      title: "Cancel",
      style: CPAlertActionStyles.cancel,
      onPress: () {
        print("Cancel pressed in action sheet");
        FlutterCarplay.popModal(animated: true);
      },
    ),
    CPAlertAction(
      title: "Dismiss",
      style: CPAlertActionStyles.destructive,
      onPress: () {
        print("Dismiss pressed in action sheet");
        FlutterCarplay.popModal(animated: true);
      },
    ),
    CPAlertAction(
      title: "Ok",
      style: CPAlertActionStyles.normal,
      onPress: () {
        print("Ok pressed in action sheet");
        FlutterCarplay.popModal(animated: true);
      },
    ),
  ],
);

FlutterCarplay.showActionSheet(template: actionSheetTemplate, animated: true);
List Template

A list presents data as a scrolling, single-column table of rows that can be divided into sections. Lists are ideal for text-based content, and can be used as a means of navigation for hierarchical information. Each item in a list can include attributes such as an icon, title, subtitle, disclosure indicator, progress indicator, playback status, or read status.
Some cars dynamically limit lists to a maximum of 12 items. You always need to be prepared to handle the case where only 12 items can be shown. Items beyond the maximum will not be shown.
final CPListTemplate listTemplate = CPListTemplate(
  sections: [
    CPListSection(
      items: [
        CPListItem(
          text: "Item 1",
          detailText: "Detail Text",
          onPress: (complete, self) {
            // Returns the self class so that the item
            // can be updated within self while loading
            self.setDetailText("You can change the detail text.. ?");
            // complete function stops the loading
            complete();
          },
          image: 'images/logo_flutter_1080px_clr.png',
        ),
        CPListItem(
          text: "Item 2",
          detailText: "Start progress bar",
          isPlaying: false,
          playbackProgress: 0,
          // asset name defined in pubspec.yaml
          image: 'images/logo_flutter_1080px_clr.png',
          onPress: (complete, self) {
            complete();
          },
        ),
      ],
      header: "First Section",
    ),
  ],
  title: "Home",
  showsTabBadge: false,
  systemIcon: "house.fill",
  // If there is no section in the list template,
  // empty view title and subtitle variants will be shown
  emptyViewTitleVariants: ["Home"],
  emptyViewSubtitleVariants: [
    "Nothing has added here yet. You can start adding right away"
  ],
);

FlutterCarplay.push(template: listTemplate, animated: true);
// OR
FlutterCarplay.setRootTemplate(rootTemplate: listTemplate, animated: true);
LICENSE
Copyright (c) 2021 Oğuzhan Atalay
Permission is hereby granted, free of charge, to any person obtaining a copy of this software and associated documentation files (the “Software”), to deal in the Software without restriction, including without limitation the rights to use, copy, modify, merge, publish, distribute, sublicense, and/or sell copies of the Software, and to permit persons to whom the Software is furnished to do so, subject to the following conditions:
The above copyright notice and this permission notice shall be included in all copies or substantial portions of the Software.
THE SOFTWARE IS PROVIDED “AS IS”, WITHOUT WARRANTY OF ANY KIND, EXPRESS OR IMPLIED, INCLUDING BUT NOT LIMITED TO THE WARRANTIES OF MERCHANTABILITY, FITNESS FOR A PARTICULAR PURPOSE AND NONINFRINGEMENT. IN NO EVENT SHALL THE AUTHORS OR COPYRIGHT HOLDERS BE LIABLE FOR ANY CLAIM, DAMAGES OR OTHER LIABILITY, WHETHER IN AN ACTION OF CONTRACT, TORT OR OTHERWISE, ARISING FROM, OUT OF OR IN CONNECTION WITH THE SOFTWARE OR THE USE OR OTHER DEALINGS IN THE SOFTWARE.