supabase_flutter
Flutter package for Supabase.
![]()

What is Supabase
Supabase is an open source Firebase alternative. We are a service to:
- listen to database changes
- query your tables, including filtering, pagination, and deeply nested relationships (like GraphQL)
- create, update, and delete rows
- manage your users and their permissions
- interact with your database using a simple UI
Status
- Alpha: Under heavy development
- Public Alpha: Ready for testing. But go easy on us, there will be bugs and missing functionality.
- Public Beta: Stable. No breaking changes expected in this version but possible bugs.
- Public: Production-ready
Features
- Null-safety
| Platform | Email Auth | Provider Auth | Database | Realtime | Storage |
|---|---|---|---|---|---|
| Android | ✅ | ✅ | ✅ | ✅ | ✅ |
| iOS | ✅ | ✅ | ✅ | ✅ | ✅ |
| macOS | ✅ | ✅ | ✅ | ✅ | |
| Windows | ✅ | ✅ | ✅ | ✅ | |
| Linux | ✅ | ✅ | ✅ | ✅ |
Getting Started
Import the package:
import 'package:supabase_flutter/supabase_flutter.dart';
Intialize Supabase before using it:
import 'package:supabase_flutter/supabase_flutter.dart';

void main() async {
  WidgetsFlutterBinding.ensureInitialized();

  await Supabase.initialize(
    url: SUPABASE_URL,
    anonKey: SUPABASE_ANNON_KEY,
    authCallbackUrlHostname: 'login-callback', // optional
    debug: true // optional
  );

  runApp(MyApp());
}
authCallbackUrlHostnameis optional. It will be used to filter Supabase authentication redirect deeplink. You need to provide this param if you use deeplink for other features on the app.
debugis optional. It’s enabled by default if you’re running the app in debug mode (flutter run --debug).
Authentication
Using authentication can be done easily.
Email authentication
import 'package:supabase_flutter/supabase_flutter.dart';

Future<void> signIn(String email, String password) async {
  final response = await Supabase.instance.client.auth.signIn(email: email, password: password);
  if (response.error != null) {
    /// Handle error
  } else {
    /// Sign in with success
  }
}
SupabaseAuthState
It helps you handle authentication with deeplink from 3rd party service like Google, Github, Twitter…
For more details, take a look at the example here
When using with a nested authentication flow, remember to call
startAuthObserver()andstopAuthObserver()before/after navigation to new screen to prevent multiple observers running at the same time. Take a look at the example here
SupabaseAuthRequiredState
It helps you protect route that requires an authenticated user.
For more details, take a look at the example here
signInWithProvider
This method will automatically launch the auth url and open a browser for user to sign in with 3rd party login.
Supabase.instance.client.auth.signInWithProvider(
  Provider.github,
  options: supabase.AuthOptions(redirectTo: ''),
);
Custom LocalStorage
As default supabase_flutter uses hive plugin to persist user session. However you can use any other plugins by creating a LocalStorage impl.
For example, we can use flutter_secure_storage plugin to store the user session in a secure storage.
// Define the custom LocalStorage implementation
class SecureLocalStorage extends LocalStorage {
  SecureLocalStorage() : super(
    initialize: () async {},
    hasAccessToken: () {
      const storage = FlutterSecureStorage();
      return storage.containsKey(key: supabasePersistSessionKey);
    }, accessToken: () {
      const storage = FlutterSecureStorage();
      return storage.read(key: supabasePersistSessionKey);
    }, removePersistedSession: () {
      const storage = FlutterSecureStorage();
      return storage.delete(key: supabasePersistSessionKey);
    }, persistSession: (String value) {
      const storage = FlutterSecureStorage();
      return storage.write(key: supabasePersistSessionKey, value: value);
    },
  );
}

// use it when initializing
Supabase.initialize(
  ...
  localStorage: SecureLocalStorage(),
);
You can use EmptyLocalStorage to disable session persistance:
Supabase.initialize(
  // ...
  localStorage: const EmptyLocalStorage(),
);
Deeplink config
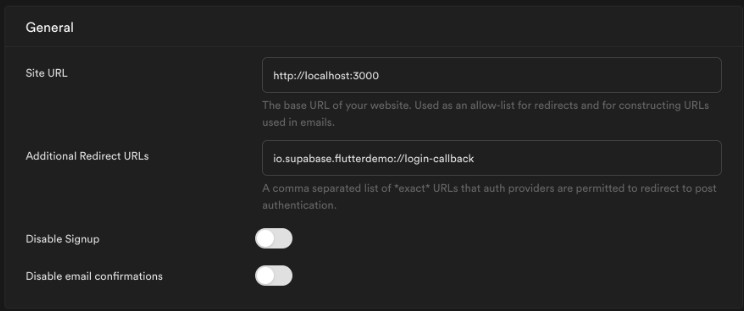
Supabase redirect URLs config
- Go to your Supabase project Authentication Settings page.
- You need to enter your app redirect callback on
Additional Redirect URLsfield.
The redirect callback url should have this format [YOUR_SCHEME]://[YOUR_AUTH_HOSTNAME]

Supabase 3rd party logins config
Follow the guide https://supabase.io/docs/guides/auth#third-party-logins
For Android
Deep Links can have any custom scheme. The downside is that any app can claim a scheme, so make sure yours are as unique as possible, eg. HST0000001://host.com.
<manifest ...>
  <!-- ... other tags -->
  <application ...>
    <activity ...>
      <!-- ... other tags -->

      <!-- Deep Links -->
      <intent-filter>
        <action android:name="android.intent.action.VIEW" />
        <category android:name="android.intent.category.DEFAULT" />
        <category android:name="android.intent.category.BROWSABLE" />
        <!-- Accepts URIs that begin with YOUR_SCHEME://YOUR_HOST -->
        <data
          android:scheme="[YOUR_SCHEME]"
          android:host="[YOUR_HOST]" />
      </intent-filter>
    </activity>
  </application>
</manifest>
The android:host attribute is optional for Deep Links.
For more info: https://developer.android.com/training/app-links/deep-linking
For iOS
Custom URL schemes can have… any custom scheme and there is no host specificity, nor entitlements or a hosted file. The downside is that any app can claim any scheme, so make sure yours is as unique as possible, eg. hst0000001 or myIncrediblyAwesomeScheme.
For Custom URL schemes you need to declare the scheme in
ios/Runner/Info.plist (or through Xcode’s Target Info editor,
under URL Types):
<!-- ... other tags -->
<plist>
<dict>
  <!-- ... other tags -->
  <key>CFBundleURLTypes</key>
  <array>
    <dict>
      <key>CFBundleTypeRole</key>
      <string>Editor</string>
      <key>CFBundleURLSchemes</key>
      <array>
        <string>[YOUR_SCHEME]</string>
      </array>
    </dict>
  </array>
  <!-- ... other tags -->
</dict>
</plist>
This allows for your app to be started from YOUR_SCHEME://ANYTHING links.
For more info: https://developer.apple.com/documentation/xcode/defining-a-custom-url-scheme-for-your-app
Contributing
- Fork the repo on GitHub
- Clone the project to your own machine
- Commit changes to your own branch
- Push your work back up to your fork
- Submit a Pull request so that we can review your changes and merge
License
This repo is licenced under MIT.