Flutter GetX Skeleton
Flutter Getx skeleton project to make creating project process fast and easy .
Introduction
We all face the same problem when we want to start a new project we have to take care of some repeatable things such as
- Theme (light/dark) & store current theme in shared pref ?
- Localization & store the current locale in shared pref ?️
- Firebase Messaging ?
- Notifications setup ?
- Safe api requests & error handling ?
- Changing between widgets during api call (loading,success,failed..etc) ?
- Snackbar,Toasts & in app notifications ?
- Making app more responsive and stop font scalling ⚖️ This project will take care of all this repatable things so you can start your project in few steps and you will have all the mentioned points set up and ready to use ?
Acknowledgment
Project was created using get_cli which is a great tool helping you to (start project,create screens/controllers, handling DI)..etc and we will list other packages that helped to create this skeleton
- GetX for state managment,navigation,mananging dependencies..etc
- flutter_screenutil to make app more responsive
- hive as local database
- get_storage as shared pref (its more easy and it read data sync)
- awesome_notifications for local notification
Clone and start project
Before discoviring folders lets first perform some actions to make the project ready to launch
-
first run this command it will generate hive type adapters (for our custom calsses that we want to store localy)
flutter packages pub run build_runner build --delete-conflicting-outputsif you dont want to use hive comment this line in main.dart
await MyHive.init(adapters: [UserModelAdapter()]);
-
To make your app responsive and look exactly as your (xd,figma..etc) design you need to set artbord size for flutter_ScreenUtil in main.dart
ScreenUtilInit(
  designSize: const Size(375, 812), // change this to your xd artboard size
-
FCM & Awesome Notifications are compined at the same class so when ever you connect your app to firebase your app will be ready to recive notifications you dont need to do anything except sending fcm notification to your api via impleminting the method (sendFcmTokenToServer) which is inside FcmHelper class ?
static _sendFcmTokenToServer(){
    var token = MySharedPref.getFcmToken();
    // TODO SEND FCM TOKEN TO SERVER
}
-
Change app pakcage name
flutter pub run change_app_package_name:main com.new.package.name -
Change app name
flutter pub run rename_app:main all="My App Name" -
Change app launch icon (replace assets/images/app_icon.png with your app icon) then run this command
flutter pub run flutter_launcher_icons:main -
FCM: firebase has recently added (add flutter app) to your firebase which will make adding our flutter(android/ios) app to firebase take only 2 steps ? but first you need to download Firebase CLI and in the terminal excute:
dart pub global activate flutterfire_clithen follow the firebase guid you will get command similar to this one
flutterfire configure --project=flutter-firebase-YOUR_PROJECT_IDand that’s it! your project is now connected to firebase and fcm is up and ready to get notifications
Quick Start
-
Responsive app: to make your app responsive you need to get advantge of using flutter_ScreenUtil so instead of using normal double values for height,width,radius..etc you need to use it like this
-
200.w // adapted to screen width
100.h // /Adapted to screen height
25.sp // adapter font size
10.r // adapter radius
// Example
Container(
    height: 100.h,
    width: 200.w,
    child: Text("Hello",style: TextStyle(fontSize: 20.sp,))
)
-
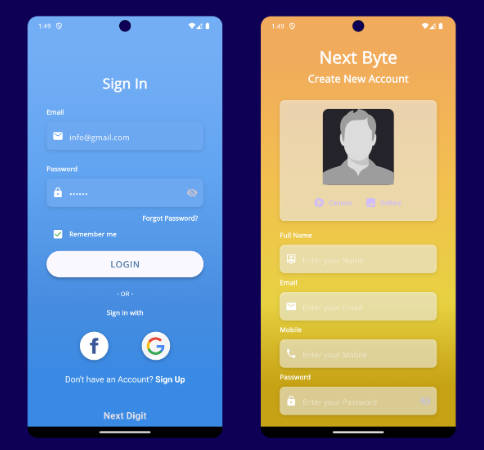
Theme
-
Change theme
MyTheme.changeTheme();
-
Check current theme
bool isThemeLight = MyTheme.getThemeIsLight();
-
-
Localization
-
Change app locale
LocalizationService.updateLanguage('en');
-
Get current locale
LocalizationService.getCurrentLocal();
-
Use translation
Text(Strings.hello.tr)
-
-
Safe api call
-
logic code (in controller)
    // api call status
  ApiCallStatus apiCallStatus = ApiCallStatus.holding;

  // getting data from api simulating
  getData() async {
    // *) indicate loading state
    apiCallStatus = ApiCallStatus.loading;
    update();
    // *) perform api call
    await BaseClient.get(
      Constants.todosApiUrl, // url
      onSuccess: (response){ // api done successfully
        data = List.from(response.data);
        // -) indicate success state
        apiCallStatus = ApiCallStatus.success;
        update(); // update ui
      },
      // if you dont pass this method base client
      // will automaticly handle error and show message
      onError: (error){
        // show error message to user
        BaseClient.handleApiError(error);
        // -) indicate error status
        apiCallStatus = ApiCallStatus.error;
        update(); // update ui
      }, // error while performing request
    );
  }
-
UI: MyWidgetsAnimator will animate between widgets depending on current api call status
GetBuilder<HomeController>(
builder: (controller){
  LocalizationService.updateLanguage('en');
  LocalizationService.getCurrentLocal();
  return MyWidgetsAnimator(
      apiCallStatus: controller.apiCallStatus,
      loadingWidget: () => const Center(child: CircularProgressIndicator(),),
      errorWidget: ()=> const Center(child: Text('Something went worng!'),),
      successWidget: () =>
         ListView.separated(
          itemCount: controller.data!.length,
          separatorBuilder: (_,__) => SizedBox(height: 10.h,),
          itemBuilder: (ctx,index) => ListTile(
              title: Text(controller.data![index]['userId'].toString()),
              subtitle: Text(controller.data![index]['title']),
            ),
        ),

  );
},
)
-
-
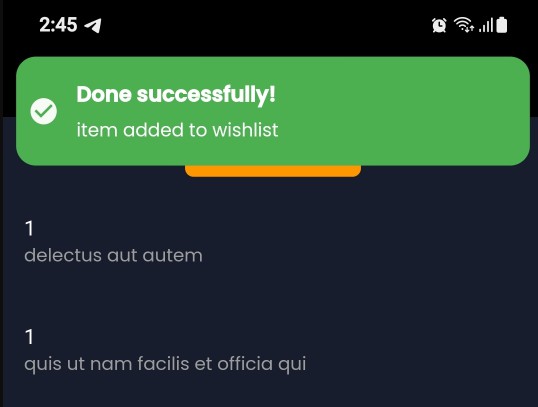
Snackbars (in app notify):
CustomSnackBar.showCustomSnackBar(title: 'Done successfully!', message: 'item added to wishlist');
CustomSnackBar.showCustomErrorSnackBar(title: 'Failed!', message: 'failed to load data');
CustomSnackBar.showCustomToast(message: 'added to card');
CustomSnackBar.showCustomErrorToast(message: 'added to card');


Discovring Project
After setting up all the needed thing now lets talk about folder structure which is mainly based on Getx Pattern and thre are some personal opnions, if you open your lib folder you will find those folders
.
└── lib
    ├── app
    │   ├── components
    │   ├── data
    │   │   ├── local
    │   │   └── models
    │   ├── modules
    │   │   └── home
    │   ├── routes
    │   └── services
    ├── config
    │   ├── theme
    │   └── translation
    └── utils
- app: will contain all our core app logic
- components: will contain all the shared UI widgets
- data: will contain our models and local data sources (local db & shared pref)
- modules: app screens
- routes: generated by get_cli and it will contain our navigation routes
- services: contain all logic for making safe & clean api calls
- config: will contain app config such as themes, localization services
- utils: for our helper classes
Features
-
Theme: if you opened theme package you will see those files
└── theme
    ├── dark_theme_colors.dart
    ├── light_theme_colors.dart
    ├── my_fonts.dart
    ├── my_styles.dart
    └── my_theme.dart
you only need to change app colors (light/dark_theme_colors) and if you want to change app fonts sizes and family just modify my_fonts.dart and that is it you dont need to worry about styles and theme you only need to edit my_syles.dart if you want to change some elemnt theme data (padding,border..etc) and if you want to change theme just use this code
// change theme and save current theme state to shared pref
MyTheme.changeTheme();
and if you want to check if the theme is dark/light just use
bool themeIsLight = MyTheme.getThemeIsLight();
// OR
bool themeIsLight = MySharedPref.getThemeIsLight();
-
Localization/translation we will use getx localization system which in the normal case code would look something like this
class LocalizationService extends Translations {
    @override
    Map<String, Map<String, String>> get keys => {
        'en_US': { 'hello' : 'Hello' },
        'ar_AR': { 'hello' : 'مرحباً' },
    };
}

Text('hello'.tr); // translated text
but because we have so many words to translate we will seprate keys file (strings_enum.dart) and languages map into different classes so code will become like this
class LocalizationService extends Translations {
      @override
      Map<String, Map<String, String>> get keys => {
          'en_US': enUs,
          'ar_AR': arAR,
      };
  }
// keys
class Strings {
    static const String hello = 'hello';
}
// english words
const Map<String, String> enUs = {
    Strings.hello : 'Hello',
}
// arabic translate
final Map<String, String> arAR = {
    Strings.hello : 'مرحبا',
}
//result
Text(Strings.hello.tr)
and that explain why we have this file structure inside our translation package
   └── translations
       ├── ar_Ar
       │   └── ar_ar_translation.dart
       ├── en_US
       │   └── en_us_translation.dart
       ├── localization_service.dart
       └── strings_enum.dart
to change language you will use
LocalizationService.updateLanguage('en');
and to get the current locale/language you can use
LocalizationService.getCurrentLocal();
// OR
MySharedPref.getCurrentLocal();
-
Safe api call: under if you opned lib/app/services package you will find 3 files
- api_call_status.dart: which contain all possible stages of our api call (loading,success,error..etc)
- api_exception.dart: custom exception class to make error handling more informative
- base_client.dart: contain our safe api call functions to perform api request the right way you would do this
class HomeController extends GetxController {
  // hold data
  List<dynamic>? data;
  // api call status
  ApiCallStatus apiCallStatus = ApiCallStatus.holding;

  // getting data from api simulating
  getData() async {
    // *) indicate loading state
    apiCallStatus = ApiCallStatus.loading;
    update();
    // *) perform api call
    await BaseClient.get(
      Constants.todosApiUrl, // url
      onSuccess: (response){ // api done successfully
        data = List.from(response.data);
        // -) indicate success state
        apiCallStatus = ApiCallStatus.success;
        update(); // update ui
      },
      // if you dont pass this method base client
      // will automaticly handle error and show message
      onError: (error){
        // show error message to user
        BaseClient.handleApiError(error);
        // -) indicate error status
        apiCallStatus = ApiCallStatus.error;
        update(); // update ui
      }, // error while performing request
    );
  }

  @override
  void onInit() {
    getData();
    super.onInit();
  }
}
base client will catch all the possible errors and if you didnt pass onError function it will automaticly catch the error in UI side code will be
GetBuilder<HomeController>(
        builder: (_){
          return MyWidgetsAnimator(
              apiCallStatus: controller.apiCallStatus,
              loadingWidget: () => const Center(child: CircularProgressIndicator(),),
              errorWidget: ()=> const Center(child: Text('Something went worng!'),),
              successWidget: () =>
                 ListView.separated(
                  itemCount: controller.data!.length,
                  separatorBuilder: (_,__) => SizedBox(height: 10.h,),
                  itemBuilder: (ctx,index) => ListTile(
                      title: Text(controller.data![index]['userId'].toString()),
                      subtitle: Text(controller.data![index]['title']),
                    ),
                ),

          );
        },
      )
NOTE: MyWidgetsAnimator will take care of ui changing with animatino you will pass the ApiCallStatus and sucess,failed,loading..etc widgets and it will take care of transition
Support
For support, email [email protected] or Facebook Emad Beltaje.