Timy app
An amazing open source group messaging app build with flutter.
Main Features
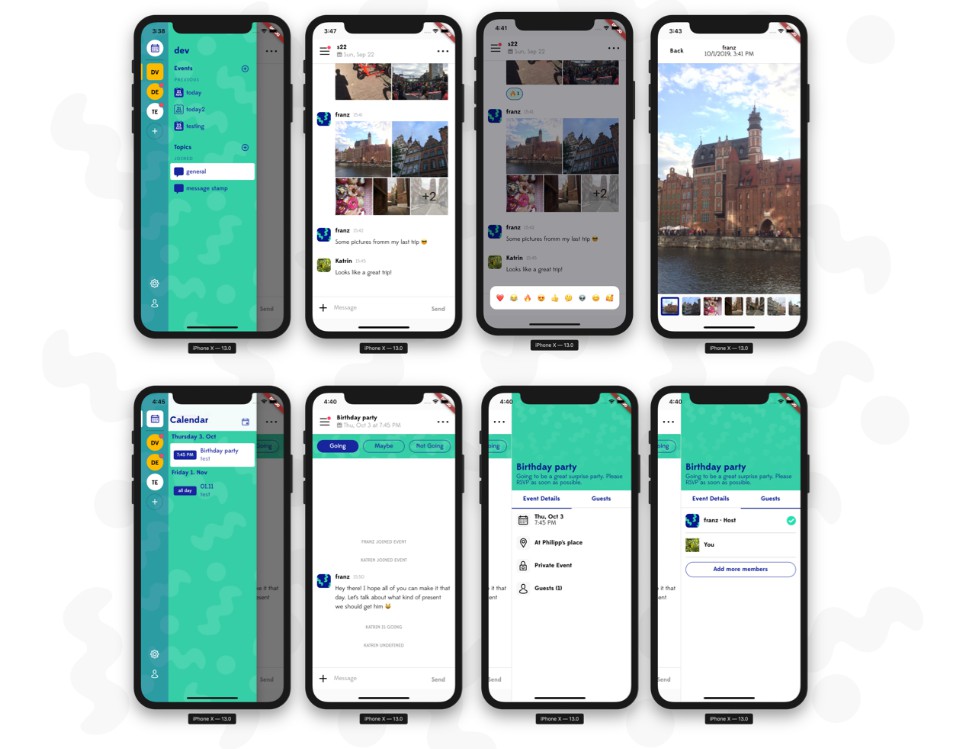
- Multiple groups (similar to Teams in Slack).
- Multiple open or private channels within groups.
- Sharing of photos and photo collections.
- React to messages with emoji.
- Push-notifications for message and channel updates.
- Specific channels for events (e.g. containing date, venue).
- Editing of event channels.
- Calendar for all upcoming and passed events aggregated over all groups and channels.
- English and German localization.
- RSVP for events.
Project Structure
This is a Flutter mobile app targeting Android and iOS.
The code for the Flutter app is contained in the folder lib and the
different native apps are in android and ios. Extra project assets are in
assets and fonts.
As well, this repo hosts a series of Firebase config files and cloud functions.
The documentation for Firebase part is inside the firebase folder.
Prerequisites & Getting Started
Client
To build and run the mobile apps you’ll need to install Flutter and its dependencies. To verify your installation run in the project’s root directory:
$ flutter doctor
The app is optimised for Android and iOS phones in portrait mode.
Note: Additionally you’ll need to add the GoogleService-Info of your Firebase app to your clients as described in B3. Configure firebase app below.
Backend (Firebase)
The backend is build using Firebase’s node.js SDK. All files are provided in the firebase folder. To deploy the code create an app and install the firebase CLI (See step 1 & 2 in Getting started).
Note: The following steps assume you’re using Firebases’ free Spark Plan. Therefore we’re performing the configuration manually.
B1. Setup sign-in method & adding users
An initial sing-in method needs to be configured.
- Select your project in console.firebase.google.com.
- Navigate to
Authentication - Select
Sign-in methodsand activateEmail / Password.
Adding a user
Currently users need to be added manually.
- In firebase navigate to
Authenticationand selectUsers. - Then
Add user.
Please copy the User-UID of the created user. We’ll need to add this ID to a group in the next step.
Note: You’ll need to have at least one user configured to use the app.
B2. Create and setup database
In the firebase console select Database under Develop and create a Cloud Firestore Database in region eur3 (europe-west).
Note: To use the app you’ll need to create a group. A “Group” is similar to e.g. a “Team” in Slack. To create one:
Create group collection
- Select the database you’ve just created.
Create collectionand name itgroups.\- Add your first group with the following properties:
| name | type | value |
|---|---|---|
| abbreviation | string | TE |
| color | string | ffffff |
| members | array | User-UID we’ve retrieved in Adding a user above |
| name | string | test |
We’ve now setup our fist test group. In addition to this step we’ll need to setup a default Channel (e.g. something similar to #general in Slack).
Create channel sub-collection
- In the
groupscollection select the newly created group. Create collectionwithin the group calledchannels.- Add your first channel with the following properties:
| name | type | value |
|---|---|---|
| name | string | general |
| type | string | TOPIC |
| visibility | string | OPEN |
B3. Configure firebase app
Next you’ll need to configure your firebase app for Flutter as described in Add Firebase to an App / Flutter
iOS
- Enter iOS-Bundle-ID:
de.janoodle.circlesApp.debug - Download and rename
GoogleService-Info.plisttoGoogleService-Info-Dev.plist. - Copy file to
ios/Runner/Firebase.
NOTE: If you’re building for release you’ll additionally need to add a GoogleService-Info-Prod.plist pointing to your production Firebase app.
B4. Deploy firebase functions
Navigate to the firebase directory and deploy all functions using:
$ firebase deploy --only functions
B5. Final steps
Run the flutter app using your favourite IDE (e.g. Visual Studio Code / Android Studio). Next you’ll need to run the app.
Note: Please skip any error that might occur.
Login with the user you’ve created above.
Next create your first event to setup the calendar collection in our backend.
Create an event
- In the app select the hamburger menu
- Hit the
+sign next toEvents - Enter any data you like and hit
Create
At the root level of your database you should now see a collection called calendar in your firebase console.
Now we’re ready to deploy all parts of our backend using:
$ firebase deploy
Deployment
The app is setup to work with a development and production environment. We suggest you create a different Firebase app for each environment.
When building for release the app will automatically use the production configuration that you’ve configured in step B3.
