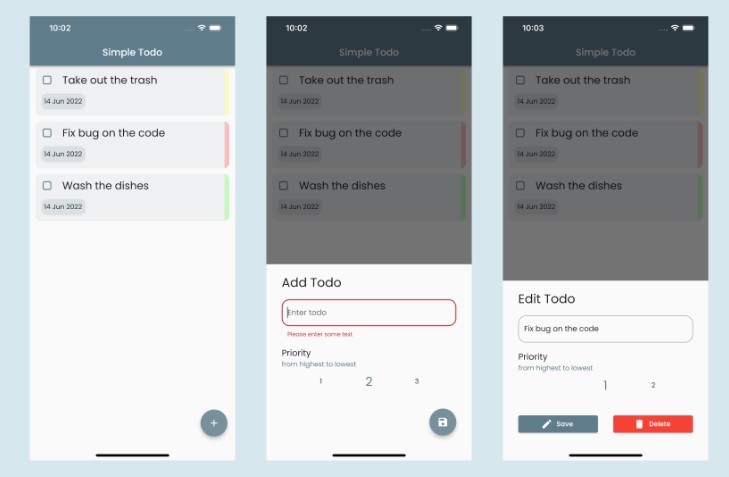
Todo List App
A cross-platform Todo List App created using Dart and Flutter. I followed the tutorials by Johannes Mike for personal learning. Then started tinkering with the app to customize it and learn more about Flutter.
Flutter Setup
Steps
Follow the instructions on offical website, depending on your operating system. In my case I am using Windows.
- Download and install
JDKfrom the link - Install Git
- Download the latest stable release of the Flutter SDK
- Extract the zip file and place the contained flutter in the desired installation location for the Flutter SDK.
- Warning: Do not install Flutter in a directory like
C:\Program Files\that requires elevated privileges. - Add
flutter\binto yourPATHenvironment variable - Download and install Android Studio and VS Code
- Install
Android SDK ToolsandGoogle usb driverfrom Android Studo’s SDK Mnagaer - Install
FLutterandDartextensions in VS Code. - Setup an emulator in
AVD Managerinside Android Studio to run your apps in a virtual device. Alternatively, you can also use a real device.
Firebase Setup
Steps for android
- Create a new
projecton you firebase account - Then create an android app
- Find
package nameatandroid/app/main/src/build.gradleand look forapplicationID - Register the app
- Add the Firebase Android configuration file to your app:
- Click Download
google-services.jsonto obtain your Firebase Android config file. - Move your config file into the module (app-level) directory of your app.
- In your root-level (
project-level) Gradle file (build.gradle), add rules to include the Google Services Gradle plugin. Check that you have Google’s Maven repository, as well.
dependencies {
    // ...

    // Add the following line:
    classpath 'com.google.gms:google-services:4.3.10'  // Google Services plugin
  }
}
- In your module (
app-level) Gradle file (usuallyapp/build.gradle), apply the Google Services Gradle plugin:
apply plugin: 'com.android.application'
// Add the following line:
apply plugin: 'com.google.gms.google-services'  // Google Services plugin

android {
  // ...
}
- Declare the dependencies for the Firebase products that you want to use in your app. Declare them in your module (
app-level) Gradle file (usuallyapp/build.gradle).
dependencies {
  // ...
  // Declare the dependency for the Firebase SDK for Google Analytics
  implementation 'com.google.firebase:firebase-analytics'
}
- Click Next
Steps for iOS
- In flutter, bundle id is same as product name for the android case. However you can ge tit by opening
iOSfodler in Xcode. SelectRunnerand thenGeneraltab. Copy yourBundle Identifierand paste in the browser. - Enter the information and register app
- Click Download
GoogleService-Info.plistto obtain your Firebase Apple platforms config file. - Drag this file inside
Runner/Runnerfolder. Make sure Add to targets is ticked. - Next go to
iOS\Podfile. Change iOS platfrom to10.0. If you don’t have thePodfile, it can be generated byflutter runor bypod initcommand. - In you browser, click
Nextmultiple times and thencontinue to console.
Links
App functionality
- Add, Edit and Delete tasks
- Colorful widgets
- Local plus cloud storage using
firebase
Resolving Issues
In case you run into some build issues after copying your project among different devices or after some package updates, try the following steps before anything else.
Run following command in root directory.
flutter clean
flutter pub get
flutter run
Unsound safety check
Some packages give unsound safety check issue if you have older versions of firebase plugins. Reolve this by adding
–no-sound-safety-check argument to your run command.
flutter run --no-sound-safety-check
Running on iOS
- iOS run needs
Podile. It will be generated automatically after Flutter run. - If
xcodedoesn’t work (in general or in copied project), removeios/Podfile(lockfile and pods as well)
Then run in the root project directory.
flutter clean
flutter pub get
flutter run
IO.GRPC Error
If you see the error "issue: I/Process ( 5084): Sending signal. PID: 5084 SIG: 9", then do the following to resolve it.
- Open
android/app/build.gradle - Inside
dependieslist, addimplementation "io.grpc:grpc-okhttp:1.32.2"
dependencies {
    .
    .
    implementation "io.grpc:grpc-okhttp:1.32.2"
}
Version Issue
‘IPHONEOS_DEPLOYMENT_TARGET’ version error
- ADD to Podfile:
post_install do |installer|
  installer.pods_project.targets.each do |target|
      flutter_additional_ios_build_settings(target)
      target.build_configurations.each do |config|
         if config.build_settings['IPHONEOS_DEPLOYMENT_TARGET'].to_f < 10.0
           config.build_settings['IPHONEOS_DEPLOYMENT_TARGET'] = '10.0'
         end
      end
  end
end
MigratMigration to cloud_firestore 2.0.0
- The migration involves adding a
<Map<String, dynamic>>in numerous places - Do it only if you use newer versions of
firebase_coreandcloud_firestore
Example
- StreamBuilder<DocumentSnapshot>(
+ StreamBuilder<DocumentSnapshot<Map<String, dynamic>>>(
  stream: FirebaseFirestore.instance.collection('movies').doc('star-wars').snapshots(),
-  builder: (BuildContext context, AsyncSnapshot<DocumentSnapshot> snapshot) {
+  builder: (BuildContext context, AsyncSnapshot<DocumentSnapshot<Map<String, dynamic>>> snapshot) {
    // ...
  }
)
My Case
- Change tranbsformer in
utils.dartfrom
static StreamTransformer<QuerySnapshot, List<T>> transformer<T>(
      T Function(Map<String, dynamic> json) fromJson) =>
  StreamTransformer<QuerySnapshot, List<T>>.fromHandlers(
    handleData: (QuerySnapshot data, EventSink<List<T>> sink) {
      final snaps = data.docs.map((doc) => doc.data()).toList();
      final users = snaps.map((json) => fromJson(json)).toList();

      sink.add(users);
    },
  );
to
  static StreamTransformer<QuerySnapshot<Map<String, dynamic>>, List<T>>
      transformer<T>(T Function(Map<String, dynamic> json) fromJson) =>
          StreamTransformer<QuerySnapshot<Map<String, dynamic>>,
              List<T>>.fromHandlers(
            handleData: (QuerySnapshot data, EventSink<List<T>> sink) {
              final snaps = data.docs.map((doc) => doc.data()).toList();
              final users = snaps
                  .map((json) => fromJson(json as Map<String, dynamic>))
                  .toList();

              sink.add(users);
            },
          );
Debug mode issue on <= iOS 14
While debugging/running on devices with iOS 14 or less, the app stopped working as soon as the program is terminated in the IDE. To resolve it, add --release to your flutter run command.
flutter run --release --no-sound-null-safety
Acknowledgement
Special thanks to Johannes Mike for his amazing youtube tutorial and repository.


