Ably Flutter Plugin
A Flutter plugin wrapping the ably-cocoa (iOS) and ably-java (Android) client library SDKs for Ably, the platform that powers synchronized digital experiences in realtime.
Ably provides the best infrastructure and APIs to power realtime experiences at scale, delivering billions of realtime messages everyday to millions of end users. We handle the complexity of realtime messaging so you can focus on your code.
Supported Platforms
iOS
iOS 10 or newer.
Android
API Level 19 (Android 4.4, KitKat) or newer.
This project uses Java 8 language features, utilising Desugaring
to support lower versions of the Android runtime (i.e. API Levels prior to 24)
If your project needs support for SDK Version lower than 24, Android Gradle Plugin 4.0.0+ must be used.
You might also need to upgrade gradle distribution accordingly.
Known Limitations
Features that we do not currently support, but we do plan to add in the future:
- Symmetric encryption (#104)
- Ably token generation (#105)
- REST and Realtime Stats (#106)
- Custom transportParams (#108)
- Push Notifications Admin (#109)
- Remember fallback host during failures (#47)
Example app
Running example app
- To run the example app, you need an Ably API key. Create a free account on ably.com and then use your API key from there in the example app.
- Clone the project
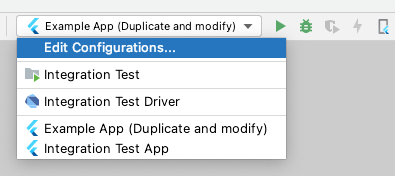
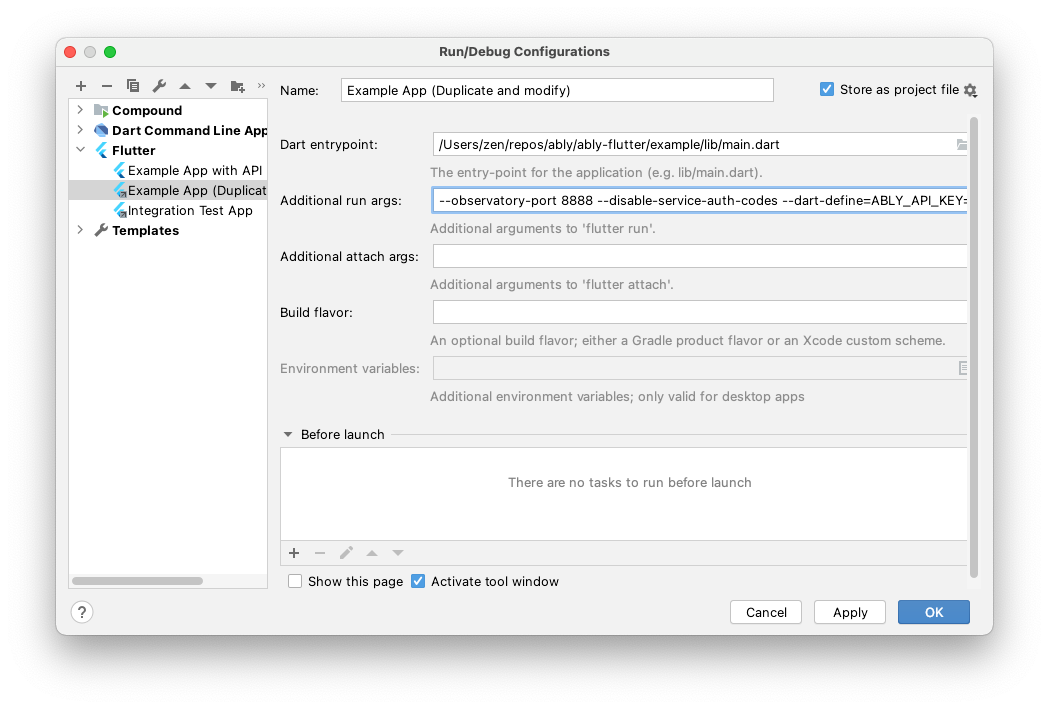
Android Studio / IntelliJ Idea
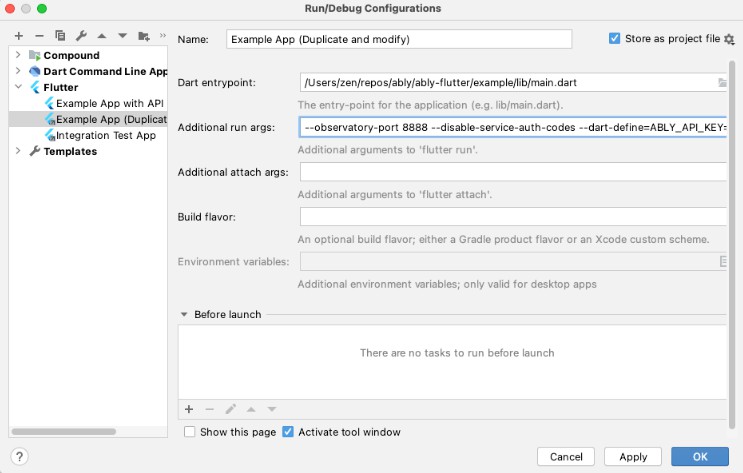
Under the run/ debug configuration drop down menu, click Edit Configurations.... Duplicate the Example App (Duplicate and modify) configuration. Leave the "Store as project file" unchecked to avoid committing your Ably API key into a repository. Update this new run configuration's additional run args with your ably API key. Run or debug the your new run/ debug configuration.
Visual Studio Code
- Under
Run and Debug,- Select the gear icon to view
launch.json - Add your Ably API key to the
configurations.args, i.e. replacereplace_with_your_api_keywith your own Ably API key. - To choose a specific device when more than one are connected: to launch on a specific device, make sure it is the only device plugged in. To run on a specific device when you have multiple plugged in, add another element to the
configuration.argsvalue, with--device-id=replace_with_device_id- Make sure to replace
replace_with_your_devicewith your device ID fromflutter devices
- Make sure to replace
- Select the gear icon to view
- select the
exampleconfiguration
Command Line using the Flutter Tool
- Change into the example app directory:
cd example - Install dependencies:
flutter pub get - Launch the application:
flutter run --dart-define ABLY_API_KEY=put_your_ably_api_key_here, remembering to replaceput_your_ably_api_key_herewith your own API key.- To choose a specific device when more than one are connected: get your device ID using
flutter devices, and then runningflutter run --dart-define=ABLY_API_KEY=put_your_ably_api_key_here --device-id replace_with_device_id
- To choose a specific device when more than one are connected: get your device ID using
Push Notifications
See PushNotifications.md for detailed information on getting PN working with the example app.
Troubleshooting
- Running on simulator on M1 macs:
- Flutter has added support for running apps on the iOS simulator running on M1 architecture, but this is not yet available on the stable branch. In the mean time, you can change the iOS target to build for Mac in Xcode.
fatal error: 'ruby/config.h' file not found: Ruby is required to install cocoapods and other tools which are used in the build process, and your machine may not have a supported version. To install an up-to-date version of Ruby:- Run
brew install rbenv ruby-build - Install rbenv:
- Run
rbenv init(and follow its recommended instructions) - Run
rbenv install 3.0.1
- Run
- Run
sudo gem install cocoapods ffi- Why do we need
ffi?: https://github.com/CocoaPods/CocoaPods/issues/9907#issuecomment-729980327
- Why do we need
- Run
Usage
Specify Dependency
Package home:
pub.dev/packages/ably_flutter
See:
Adding a package dependency to an app
Import the package
import 'package:ably_flutter/ably_flutter.dart' as ably;
Configure a Client Options object
For guidance on selecting an authentication method (basic authentication vs. token authentication), read Selecting an authentication mechanism.
Authenticating using basic authentication/ API key (for running example app/ test apps and not for production)
// Specify your apiKey with `flutter run --dart-define=ABLY_API_KEY=replace_your_api_key`
final String ablyApiKey = const String.fromEnvironment(Constants.ablyApiKey);
final clientOptions = ably.ClientOptions.fromKey(ablyApiKey);
clientOptions.logLevel = ably.LogLevel.verbose;  // optional
Authenticating using token authentication
// Used to create a clientId when a client first doesn't have one.
// Note: you should implement `createTokenRequest`, which makes a request to your server that uses your Ably API key directly.
final clientOptions = ably.ClientOptions()
// ..clientId = _clientId // Optionally set the clientId
  ..autoConnect = false
  ..authCallback = (TokenParams tokenParams) async {
    try {
      // If a clientId was set in ClientOptions, it will be available in Ably.TokenParams.
      final tokenRequestMap =
      await createTokenRequest(tokenParams: tokenParams);
      return ably.TokenRequest.fromMap(tokenRequestMap);
    } catch (e) {
      print("Something went wrong in the authCallback:");
      print(e);
    }
  };
this._ablyClient = new ably.Realtime(options: clientOptions);
await this._ablyClient.connect();
Using the REST API
Creating the REST client instance:
ably.Rest rest = ably.Rest(options: clientOptions);
Getting a channel instance
ably.RestChannel channel = rest.channels.get('test');
Publishing messages using REST:
// both name and data
await channel.publish(name: "Hello", data: "Ably");

// just name
await channel.publish(name: "Hello");

// just data
await channel.publish(data: "Ably");

// an empty message
await channel.publish();
Get REST history:
void getHistory([ably.RestHistoryParams params]) async {
  // getting channel history, by passing or omitting the optional params
  var result = await channel.history(params);

  var messages = result.items;        // get messages
  var hasNextPage = result.hasNext(); // tells whether there are more results
  if (hasNextPage) {
    result = await result.next();     // will fetch next page results
    messages = result.items;
  }
  if (!hasNextPage) {
    result = await result.first();    // will fetch first page results
    messages = result.items;
  }
}

// history with default params
getHistory();

// sorted and filtered history
getHistory(ably.RestHistoryParams(direction: 'forwards', limit: 10));
Get REST Channel Presence:
void getPresence([ably.RestPresenceParams params]) async {
  // getting channel presence members, by passing or omitting the optional params
  var result = await channel.presence.get(params);

  var presenceMembers = result.items; // returns PresenceMessages
  var hasNextPage = result.hasNext(); // tells whether there are more results
  if (hasNextPage) {
    result = await result.next();     // will fetch next page results
    presenceMembers = result.items;
  }
  if (!hasNextPage) {
    result = await result.first();    // will fetch first page results
    presenceMembers = result.items;
  }
}

// getting presence members with default params
getPresence();

// filtered presence members
getPresence(ably.RestPresenceParams(
  limit: 10,
  clientId: '<clientId>',
  connectionId: '<connectionID>',
));
Get REST Presence History:
void getPresenceHistory([ably.RestHistoryParams params]) async {

  // getting channel presence history, by passing or omitting the optional params
  var result = await channel.presence.history(params);

  var presenceHistory = result.items; // returns PresenceMessages
  var hasNextPage = result.hasNext(); // tells whether there are more results
  if (hasNextPage) {
    result = await result.next();     // will fetch next page results
    presenceHistory = result.items;
  }
  if (!hasNextPage) {
    result = await result.first();    // will fetch first page results
    presenceHistory = result.items;
  }
}

// getting presence members with default params
getPresenceHistory();

// filtered presence members
getPresenceHistory(ably.RestHistoryParams(direction: 'forwards', limit: 10));
Using the Realtime API
Creating the Realtime client instance:
ably.Realtime realtime = ably.Realtime(options: clientOptions);
Listening for connection state change events:
realtime.connection
  .on()
  .listen((ably.ConnectionStateChange stateChange) async {
    print('Realtime connection state changed: ${stateChange.event}');
    setState(() {
      _realtimeConnectionState = stateChange.current;
    });
});
Listening for a particular connection state change event (e.g. connected):
realtime.connection
  .on(ably.ConnectionEvent.connected)
  .listen((ably.ConnectionStateChange stateChange) async {
    print('Realtime connection state changed: ${stateChange.event}');
    setState(() {
      _realtimeConnectionState = stateChange.current;
    });
});
Creating a Realtime channel instance:
ably.RealtimeChannel channel = realtime.channels.get('channel-name');
Listening for channel events:
channel.on().listen((ably.ChannelStateChange stateChange) {
  print("Channel state changed: ${stateChange.current}");
});
Attaching to the channel:
await channel.attach();
Detaching from the channel:
await channel.detach();
Subscribing to messages on the channel:
var messageStream = channel.subscribe();
var channelMessageSubscription = messageStream.listen((ably.Message message) {
  print("New message arrived ${message.data}");
});
Use channel.subscribe(name: "event1") or channel.subscribe(names: ["event1", "event2"]) to listen to specific named messages.
UnSubscribing from receiving messages on the channel:
await channelMessageSubscription.cancel();
Publishing channel messages
// both name and data
await channel.publish(name: "event1", data: "hello world");
await channel.publish(name: "event1", data: {"hello": "world", "hey": "ably"});
await channel.publish(name: "event1", data: [{"hello": {"world": true}, "ably": {"serious": "realtime"}]);

// single message
await channel.publish(message: ably.Message()..name = "event1"..data = {"hello": "world"});

// multiple messages
await channel.publish(messages: [
  ably.Message()..name="event1"..data = {"hello": "ably"},
  ably.Message()..name="event1"..data = {"hello": "world"}
]);
Get Realtime history
void getHistory([ably.RealtimeHistoryParams params]) async {
  var result = await channel.history(params);

  var messages = result.items;        // get messages
  var hasNextPage = result.hasNext(); // tells whether there are more results
  if (hasNextPage) {
    result = await result.next();     // will fetch next page results
    messages = result.items;
  }
  if (!hasNextPage) {
    result = await result.first();    // will fetch first page results
    messages = result.items;
  }
}

// history with default params
getHistory();

// sorted and filtered history
getHistory(ably.RealtimeHistoryParams(direction: 'forwards', limit: 10));
Enter Realtime Presence:
await channel.presence.enter();

// with data
await channel.presence.enter("hello");
await channel.presence.enter([1, 2, 3]);
await channel.presence.enter({"key": "value"});

// with Client ID
await channel.presence.enterClient("user1");

// with Client ID and data
await channel.presence.enterClient("user1", "hello");
await channel.presence.enterClient("user1", [1, 2, 3]);
await channel.presence.enterClient("user1", {"key": "value"});
Update Realtime Presence:
await channel.presence.update();

// with data
await channel.presence.update("hello");
await channel.presence.update([1, 2, 3]);
await channel.presence.update({"key": "value"});

// with Client ID
await channel.presence.updateClient("user1");

// with Client ID and data
await channel.presence.updateClient("user1", "hello");
await channel.presence.updateClient("user1", [1, 2, 3]);
await channel.presence.updateClient("user1", {"key": "value"});
Leave Realtime Presence:
await channel.presence.leave();

// with data
await channel.presence.leave("hello");
await channel.presence.leave([1, 2, 3]);
await channel.presence.leave({"key": "value"});

// with Client ID
await channel.presence.leaveClient("user1");

// with Client ID and data
await channel.presence.leaveClient("user1", "hello");
await channel.presence.leaveClient("user1", [1, 2, 3]);
await channel.presence.leaveClient("user1", {"key": "value"});
Get Realtime Presence members:
var presenceMessages = await channel.presence.get();

// filter by Client Id
var presenceMessages = await channel.presence.get(
  ably.RealtimePresenceParams(
    clientId: 'clientId',
  ),
);

// filter by Connection Id
var presenceMessages = await channel.presence.get(
  ably.RealtimePresenceParams(
    connectionId: 'connectionId',
  ),
);
Get Realtime Presence history
void getPresenceHistory([ably.RealtimeHistoryParams params]) async {
  var result = await channel.presence.history(params);

  var messages = result.items;        // get messages
  var hasNextPage = result.hasNext(); // tells whether there are more results
  if (hasNextPage) {
    result = await result.next();     // will fetch next page results
    messages = result.items;
  }
  if (!hasNextPage) {
    result = await result.first();    // will fetch first page results
    messages = result.items;
  }
}

// presence history with default params
getPresenceHistory();

// sorted and filtered history
getPresenceHistory(ably.RealtimeHistoryParams(direction: 'forwards', limit: 10));
Subscribe to Realtime Presence messages
// subscribe for all presence actions
channel
  .presence
  .subscribe()
  .listen((presenceMessage) {
    print(presenceMessage);
  },
);

// subscribe for specific action
channel
  .presence
  .subscribe(action: PresenceAction.enter)
  .listen((presenceMessage) {
    print(presenceMessage);
  },
);

// subscribe for multiple actions
channel
  .presence
  .subscribe(actions: [
    PresenceAction.enter,
    PresenceAction.update,
  ])
  .listen((presenceMessage) {
    print(presenceMessage);
  },
);
Push Notifications
See PushNotifications.md for detailed information on using PN with this plugin.
Caveats
RTE6a compliance
Using the Streams based approach doesn't fully conform with
RTE6a
from our
client library features specification.
The Problem
StreamSubscription subscriptionToBeCancelled;

// Listener registered 1st
realtime.connection.on().listen((ably.ConnectionStateChange stateChange) async {
  if (stateChange.event == ably.ConnectionEvent.connected) {
    await subscriptionToBeCancelled.cancel();       // Cancelling 2nd listener
  }
});

// Listener registered 2nd
subscriptionToBeCancelled = realtime.connection.on().listen((ably.ConnectionStateChange stateChange) async {
  print('State changed');
});
In the example above, the 2nd listener is cancelled when the 1st listener is notified about the "connected" event.
As per
RTE6a,
the 2nd listener should also be triggered.
It will not be as the 2nd listener was registered after the 1st listener and stream subscription is cancelled immediately after 1st listener is triggered.
This wouldn't have happened if the 2nd listener had been registered before the 1st was.
However, using a neat little workaround will fix this...
The Workaround - Cancelling using delay
Instead of await subscriptionToBeCancelled.cancel();, use
Future.delayed(Duration.zero, () {
    subscriptionToBeCancelled.cancel();
});